How to Turn on Screen Time on Mac

Last updated on August 14th, 2023 at 12:12 pm
When your child spends a lot of time on your Mac and says most of the time he spent was on homework, would you certainly believe that he is telling the truth and not lying? Are you concerned about how he spends his time on the Mac machine?
Well, you should be concerned as you never know when kids are navigated to objectionable or dangerous websites.
We need to restrict our kids to be exposed to unknown or unwanted vulnerable Apps and content. For that, we may take the help of a Parental Control App or we may also take advantage of Mac’s Screen Time feature. Now if you are wondering how to turn ON screen time on Mac and how to keep a tap on the same, we have got it sorted for you in this article.
Let’s discuss how to turn ON Mac screen time and keep our kids secured using this Mac’s built-in parental control App.
What is Mac’s Screen Time?
Screen Time is a tool that was launched with the iPhone and iPad in the year 2018 designed to record the amount of time you spend on various apps, social networking sites, and games. If you are spending too much time on your iPhone and iPad, with iOS 12, you can set screen time limits for yourself or your child and develop some healthy device habits.
Screen Time is loaded with blocking features to limit usage. There are other parental controls available which are capable of placing limits on communication, mostly from specific contacts. Let’s understand how to turn on Mac Screen Time.
How to turn ON Mac Screen Time?
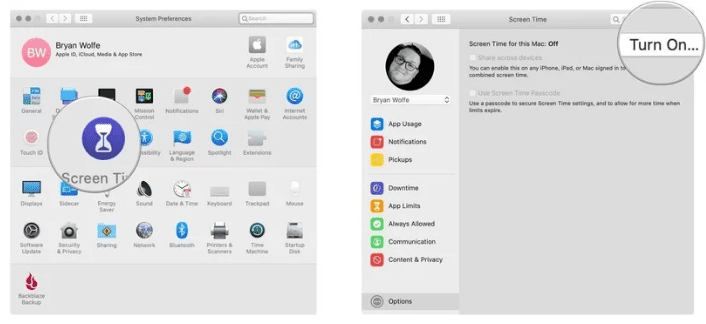
Step 1. Go to system preferences in MacOS Catalina.
Step 2. Click on Screen Time in System Preferences.
Step 3. Select the Options button at the bottom left.
Step 4. Click the Turn On button at the top right.
How to turn OFF Screen Time on MacOS?
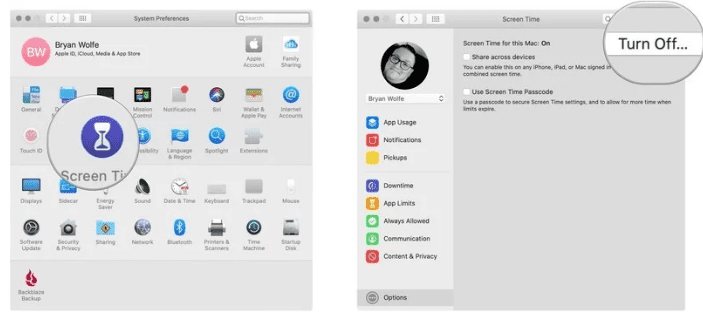
Step 1. Go to system preferences in MacOS Catalina.
Step 2. Click on Screen Time in System Preferences.
Step 3. Select the Options button at the bottom left.
Step 4. Click the Turn OFF button at the top right.
How to Access The Parental Controls Log?
Now once you have captured the Screen Time, We are sure you would wish to know how your kids spent their time on the device. Now it’s time to figure out for what we did this entire exercise for.
Here are the steps to access the Parental Controls log, work on your child’s computer:
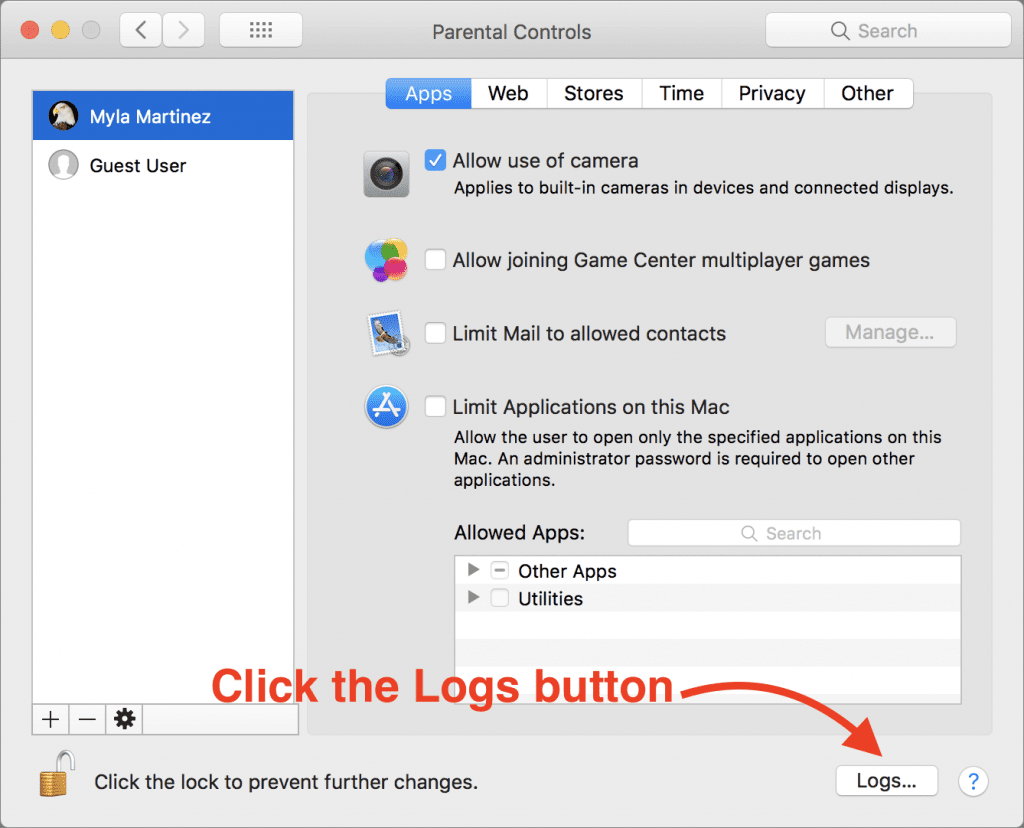
Step 1. Open System Preferences and go to Parental Controls.
Step 2. Click the lock icon at the lower left of the pane, and sign in with your administrator password.
Step 3. From the list at the left, select your child’s account.
Step 4. At the lower right of the pane, click the Logs button.
Add a password to Screen Time on MacOS
When you turn ON Mac Screen Time, there are possibilities that your kid can turn it OFF. You get an option to set a password in Screen Time feature on Mac. This will ensure that your settings on the machine is secured and also use the password to extend the time for users when necessary.
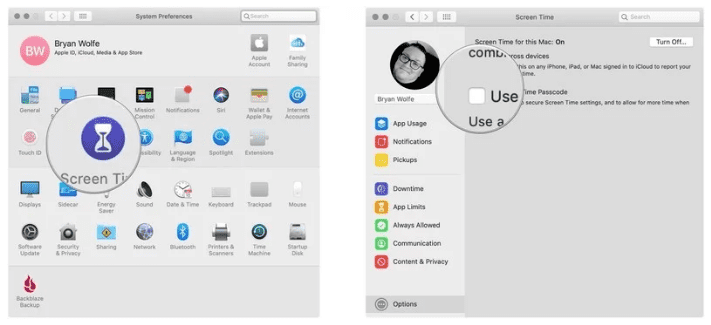
Step 1. Open Screen Time in System Preferences.
Step 2. Select the Options button at the bottom left corner.
Step 3. Check the ‘Use Screen Time Password’ box.
Schedule Downtime using Screen Time for MacOS
Another important feature of Mac Parental Control is that you can schedule downtime on Mac Screen Time. During Downtime, only apps you choose to allow will work and you can make phone calls when applicable. To set up a Downtime schedule, you may follow these steps:
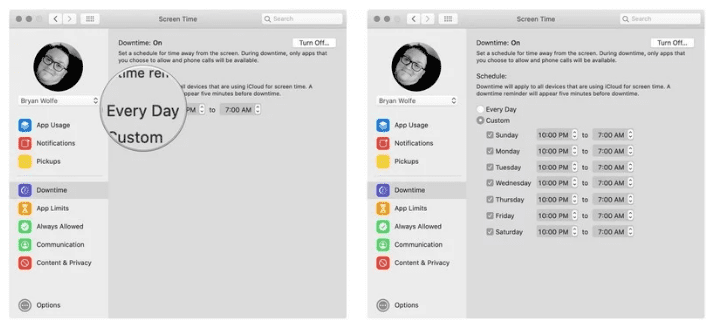
Step 1. Go to Screen Time in System Preferences.
Step 2. Click on ‘Downtime’ on the left-hand side panel.
Step 3. Click on the ‘Turn On’ button to activate Downtime.
Step 4. Configure Downtime settings using the radio buttons by selecting ‘Every Day’ or ‘Custom’ depending on your preferences.
Configure Screen Time to Limit Social Media Use on iPhone or iPad
As we have set Mac Screen Time for Mac computer, we can also set preferences using Screen Time to Limit Social Media Use on iPhone or iPad. This parental Control feature is useful for parents who leave their kids with smartphones to keep them engaged or make use of smartphones.
Step 1. Open ‘Settings’ on your iPhone or iPad and go to ‘Screen Time’.
Step 2. Tap on ‘App Limits’ and configure ‘Add Limit’ under the App Limits section.
Step 3. Look for and tap on ‘Social Networking’ and tap on ‘Add’.
Step 4. Scroll the slider to select the time limit you wish to enforce on all ‘Social Networking’ apps, then tap on ‘Back’ or exit out of ‘Settings’ when finished.
Summing Up
So next time whenever you handover any device to your kid, you know how to turn on Mac Screen Time and ensure that it is turned ON and your kid’s activities are getting captured. So make use of these parental control Apps and if this article helped you or you know someone who can be benefited with these steps, do like and share the article.
If you have any other issues related to Screen Time, do share the same in the comment section and we will revert with an appropriate solution to it.
Author Bio:
Dinesh Lakhwani 

Dinesh Lakhwani, the entrepreneurial brain behind “TechCommuters,” achieved big things in the tech world. He started the company to make smart and user-friendly tech solutions. Thanks to his sharp thinking, focus on quality and the motto of never giving up, TechCommuters became a top player in the industry. His commitment to excellence has propelled the company to a leading position in the industry.
Popular Post


Recent Post

Top 9 Browsers With Built-In VPN – VPN Browser
Online browsing is no longer private by default. Every website collects data in some form. This includes location details, device information, and browsing habits. Over time, this data builds a clear picture of user behavior. Many people are now uncomfortable with this level of tracking. A VPN browser helps reduce this exposure. It adds a […]

AI In Cyber Security: Who is Winning, Hackers or Security Companies
Cybersecurity once followed clear rules. Companies built firewalls. Users created passwords. Antivirus tools scanned files and removed known threats. When an attack happened, security teams studied it and added new rules. This method worked for many years. It created a sense of control and stability. That sense is gone today. Artificial intelligence has changed how […]

The Biggest AI-Run Cyber Attacks Of All Time
Artificial intelligence is now part of everyday technology. It helps people search faster. It improves medical research. It supports businesses in making better choices. But AI is not used only for good purposes. Cyber criminals have also learned how to use it. This has changed the nature of cyber attacks across the world. In the […]

Switch To a Dark Background Theme on Windows: Enable Dark Mode
People often like a screen that feels gentle on the eyes. A darker style softens bright areas and makes long computer sessions easier to handle. It also gives the desktop a cleaner and more modern feel. When you switch to a dark background theme in Windows, the colors shift to deeper shades that reduce glare […]
![Complete Guide on Managing Audio Input Devices [Latest In 2026]](https://www.techcommuters.com/wp-content/uploads/2025/12/Complete-Guide-on-Managing-Audio-Input-Devices.webp)
Complete Guide on Managing Audio Input Devices [Latest In 2026]
People use microphones for meetings, games, classes, recordings, and voice chats, so any problem with the device can interrupt their work. Even a small system error can make the voice weak or stop it fully. This is why knowing the basics of managing audio input devices is helpful for new and experienced users. Windows includes […]

Resetting Audio Settings on Windows 11: Complete Guide
Sound problems can disrupt work, study, or entertainment. Many users face issues where the audio becomes too low, too loud, unclear, or does not play at all. A common way to solve these problems is by resetting audio settings to their original state. This helps Windows rebuild its sound setup from the beginning. Windows 11 […]

Troubleshooting Headphone Detection: Headphones Not Detected/Working
A lot of users run into sound problems at some point. A common one is when the computer does not pick up the headphones. You plug them in, but the speakers keep playing. This can break your focus during work, movies, music, or calls. It also causes confusion because the reason is not always clear […]

How To Re-Pair Bluetooth Earbuds For Stereo Sound on Windows
Wireless earbuds are often paired with computers for rich stereo sound, but things don’t always go smoothly. Sometimes, the system defaults to mono audio or fails to activate the correct playback mode. This can disrupt music, calls, or gaming, making the sound feel flat and lifeless. These glitches usually stem from improper setup. Windows might […]

How To Manage Camera Permissions for App On Windows: Complete Guide [2026]
Many users run into issues when trying to join video calls or online meetings—their camera simply won’t turn on. This can happen for a few reasons: Windows might be blocking access, or the app may not have the correct permissions. These hiccups often lead to confusion and frustration. Fortunately, Windows provides straightforward tools to help […]
![Help With Color Management In Windows Complete Guide [2026]](https://www.techcommuters.com/wp-content/uploads/2025/12/Help-With-Color-Management-In-Windows-Complete-Guide.webp)
Help With Color Management In Windows: Complete Guide [2026]
Color often decides how we experience a picture, a video, a website, or even a simple chart. Many users feel confused when colors look different on each screen. A monitor may show a softer shade while a laptop shows a sharper one. This creates doubt and slows down work. It can also lead to mistakes […]

