How to turn off/disable OneDrive on Windows?

Last updated on January 31st, 2025 at 6:56 am
Cloud storage is the ultimate solution for the different needs of modern smart device users. Windows has solved the dilemma of selecting the perfect cloud solution for its users by introducing OneDrive, which works seamlessly on all the latest versions. However, many people look for different ways to turn off/ disable OneDrive on Windows 10.
Let us go through all the possible solutions on how to turn off OneDrive. We’ll start with a brief overview of OneDrive, followed by the possible reasons for quitting its services. The step-by-step guide for disabling OneDrive on Windows 10 will help readers understand all about it in detail.
OneDrive- An Overview
It is a cloud service by Microsoft connecting with different system files. Launched in 2007, it allows file and data saving on the cloud with free storage of up to 5GB. It can sync files across different Windows, MacOS, iOS, and Android devices. Starting from Windows 10, OneDrive is pre-installed on these systems. Let us now have a quick look at some of its top features:
OneDrive features
- It is easy to send the link to anyone for sharing files and folders in OneDrive.
- It has an Office Online feature allowing the uploading, creating, editing, and sharing of different OneNote, PowerPoint, Excel, and Word documents.
- All the online edited files in OneDrive are saved in real-time for improved data protection.
- It can sync pictures automatically. Hence, it uploads pictures from the available device to the cloud and offers a quick backup if the device fails, and that too without any manual intervention.
Why disable OneDrive on Windows 10?
After going through OneDrive’s top features, time for the top reasons citing the need to disable it on Windows 10. While OneDrive seems to be the best possible solution for cloud storage on different operating systems, many Windows users may look to disable it. This can be due to the following reasons:
- If the user wants to remove the data from the specific device connected to OneDrive.
- If the user wants to switch to other cloud storage options.
- If the system is already using some cloud storage solution.
Methods to turn off/ disable OneDrive on Windows
After going through the different reasons for disabling OneDrive, it comes down to the steps to do it. So, here you’re at the top methods to turn off or disable OneDrive on Windows systems. The top methods for the same include the following:
Method 1: Using settings
The settings menu can be used to disable OneDrive on Windows 10. You must have the details you’re your email address, and other account-related information to complete the process. Hence, before starting to use the settings menu, be ready with all the OneDrive account-related details to complete the OneDrive disabling process.
Once you’re ready with all the details, it is easy to follow the following detailed steps for the same are:
Step 1: Open the OneDrive icon in the taskbar.
Step 2: Go to the context menu and select “More” to continue.
Step 3: Go to the “Settings” option.
Step 4: Go to the pop-up menu and uncheck the option “Start OneDrive automatically when I sign into Windows.
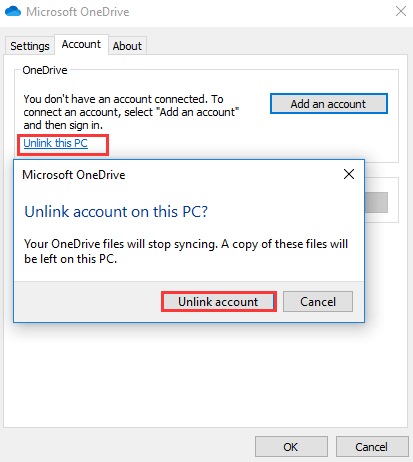
Step 5: Next, go to the “Accounts” option and click on “Unlink this PC.”
Step 6: Lastly, press the “Unlock account” to complete the process.
Step 7: You’ll be prompted to enter the email address and other account details for disabling OneDrive.
Method 2: Using the registry editor
The registry editor is a useful and powerful tool for different system settings. However, all you need to do is change all its values and keys carefully, as a minute difference can make the entire system useless.
The important step in using the registry editor for turning off OneDrive is to keep its backup. It can be achieved using different tools. You can select any of the available tools and then go ahead for registry editor backup.
Once the backup is complete, it saves the system from unnecessary changes, and you can go ahead for using it to turn off OneDrive. The detailed steps for using the registry editor to turn off OneDrive are as follows:
Step 1: Start by pressing Windows and R keys to open the “Run” dialog.
Step 2: Once the registry editor opens navigate to the following key
HKEY_LOCAL_MACHINE\SOFTWARE\Policies\Microsoft\Windows

Step 3: Now right-click on the Windows key and select the “New” option followed by the “Key” option.
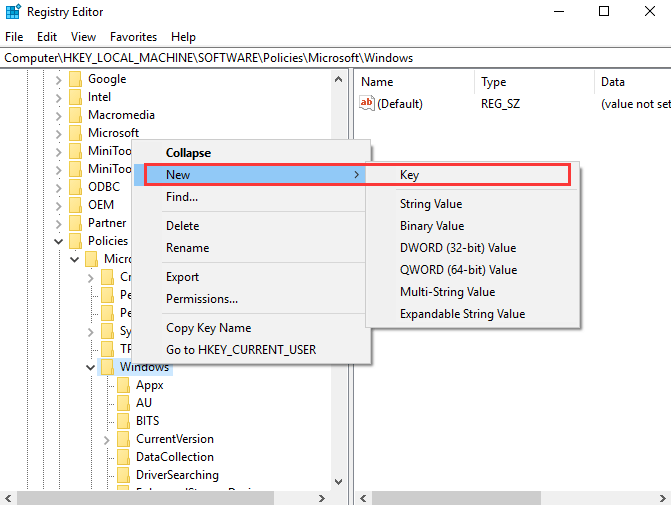
Step 4: Name the new key “OneDrive.”
Step 5: Next, select the OneDrive key and right-click on the right white area. Now, select the “New” option followed by “DWORD(32-bit) Value” to continue.
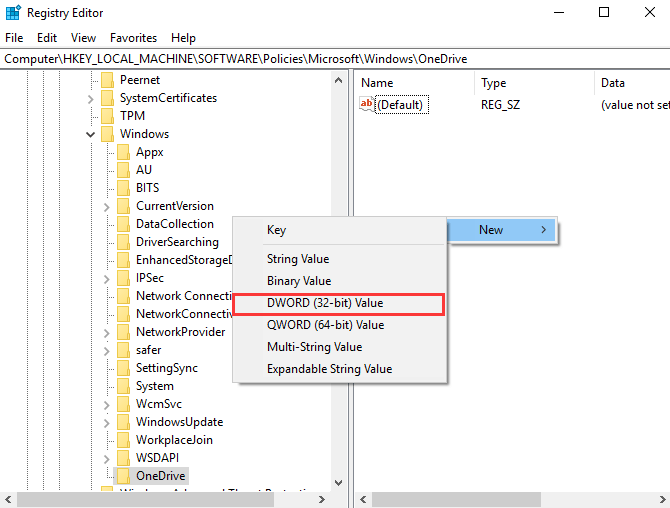
Step 6: Name the new key and double-click the new key and change the Value Data to 1.
Step 7: Lastly, close the Registry Editor window and reboot the system now.
Method 3: Using group policy
Group policy controls the working environment of the user accounts and computer accounts on Windows system. It offers an efficient management of the Windows system with ease of administration. Users can quickly deploy software, updates, and other patches through group policy only.
Some of the other top uses of the group policy in Windows include folder redirection configuration and better password policy enforcement.
Hence, it can be help Windows users to disable the OneDrive from the system safely. All you need to do start by safely opening the group policy and follow the directed steps to use it. The quick steps for using the group policy to turn off OneDrive are:
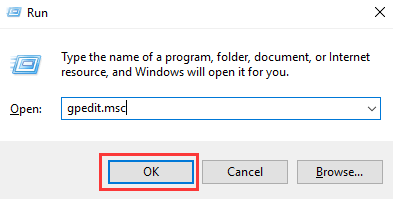
Step 1: Press Windows and R key together to open the “Run” dialog.
Step 2: Now type “msc” in the dialog box and click on the “OK” option.
Step 3: The Local Group Policy Editor window will open now. Go to the “OneDrive” folder by selecting “Computer Configuration,” “Administrative Templates,” “Windows Components,” and “OneDrive” options.
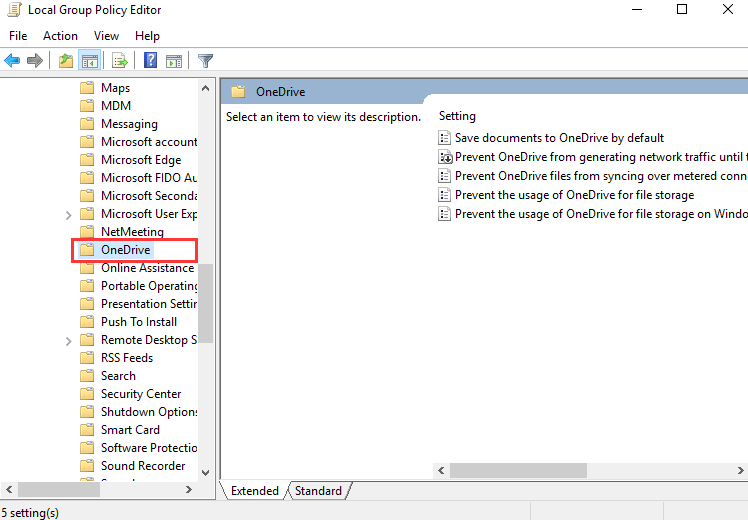
Step 4: Click on the item “Prevent the usage of OneDrive for file storage.”
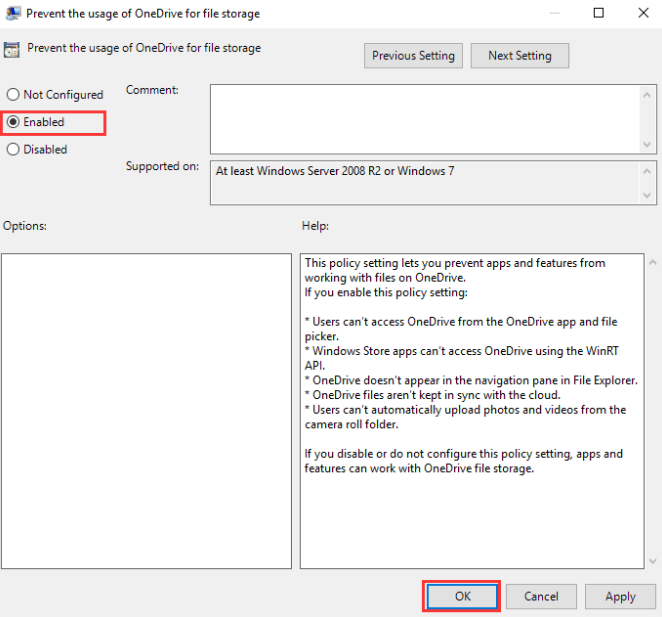
Step 5: Now, a pop-up window will open. All you need to do is select the “Enabled” option and press “Apply” followed by “OK” to confirm the changes.
Step 6: Now, restart your system to confirm if OneDrive is available or not.
Wrapping Up
Hope everything is clear to our readers about how to turn off OneDrive. It is the powerful cloud storage service offered by Microsoft, which is available for different operating systems, including Windows. It is a feature-rich service offering automatic data saving and quick file sharing using simple links.
Different reasons, like switching to other cloud options, using some other compulsory cloud solutions, etc., may compel users to disable OneDrive on Windows 10. Users can go for the different methods mentioned above to safely and quickly turn off OneDrive from their Windows devices. The easy to use steps further makes it possible for the beginners and professionals to manage OneDrive on their own.
Author Bio:
Dinesh Lakhwani 

Dinesh Lakhwani, the entrepreneurial brain behind “TechCommuters,” achieved big things in the tech world. He started the company to make smart and user-friendly tech solutions. Thanks to his sharp thinking, focus on quality and the motto of never giving up, TechCommuters became a top player in the industry. His commitment to excellence has propelled the company to a leading position in the industry.
Popular Post


Recent Post

How to Switch Windows 10 to a Local Account: Complete Guide
Windows 10 allows users to sign in with either a Microsoft account or a local account. When you set up a new computer, the system often suggests using a Microsoft account. This account connects your device to Microsoft services such as Outlook, OneDrive, and the Microsoft Store. It also syncs settings, themes, and passwords across […]

How To Change Default Apps For File Types In Windows
Windows is designed to make using your computer easy. One way it does this is by assigning default apps to different file types. This means when you open a file, Windows automatically opens it with a specific program. For example, photos may open with Photos, music with Groove Music, and PDFs with Edge. These default […]

How To Adjust The Mouse Pointer Speed: Complete Guide
Using a computer every day means you use the mouse a lot. The mouse pointer moves on the screen and helps you click, scroll, and select items. Many people never think about the speed of the mouse pointer. They have used the default setting for years. This can cause small problems over time. A slow […]

How to Change Mouse Scrolling Settings In Windows
A mouse is one of the most used computer tools. People use it every day. They scroll through emails. They scroll through documents. They scroll through websites and images. The movement becomes automatic. Most users do not notice it. That is why problems often go unnoticed. Scrolling problems show up slowly. At first, it feels […]

Keyboard Light Settings: Keyboard Lighting Control [Complete Guide]
Keyboards are no longer simple typing tools. Well, yes! Over time, they have evolved to include features that improve comfort, visibility, and overall experience. One of the most useful features today is keyboard lighting. It helps users work comfortably in low-light conditions. It also reduces strain when typing for long hours. Many users first notice […]

Customizing Pointer Appearance: Complete Guide
The way your mouse pointer looks on your computer may seem like a small detail. But customizing pointer appearance can make using your PC more comfortable and visually appealing. Many users do not realize that they can change the pointer size, color, and style to fit their needs. Whether you want a bigger pointer for […]

How To Choose a Computer Monitor: Monitor Buying Guide
Buying a monitor looks easy. Many people think all screens are the same. That belief causes regret later. A monitor is not just a display. It is a daily tool. You read on it. You work on it. You relax with it. Small problems become big over time. Poor brightness hurts eyes. Bad size causes […]

How To Get Help With File Explorer in Windows 11 [Complete Guide]
File Explorer is one of the most important tools in Windows 11. It is used to open folders, view files, and manage stored data. Almost every action on a Windows computer depends on it in some way. When users open documents, save downloads, or organize photos, File Explorer is always involved. Because it is used […]

How To Fix A Frozen Computer: Complete Guide [Windows 11/10]
A frozen computer is one of the most common problems Windows users face. The screen stops responding. The mouse pointer does not move. Keyboard inputs do nothing. You may hear the fan running loudly. Sometimes the system looks alive, but nothing works. This situation often happens when you are busy or working on something important. […]

How to Upgrade Computer RAM: Complete Guide
Upgrading RAM is one of the simplest ways to improve a computer. It helps the system feel faster and smoother. Apps open quicker. Browsers handle more tabs. Games and tools run with less delay. Many users search for how to upgrade computer RAM because it gives real results without high cost. You do not need […]

