Complete Guide to Use Safety Check on iPhone with iOS 16
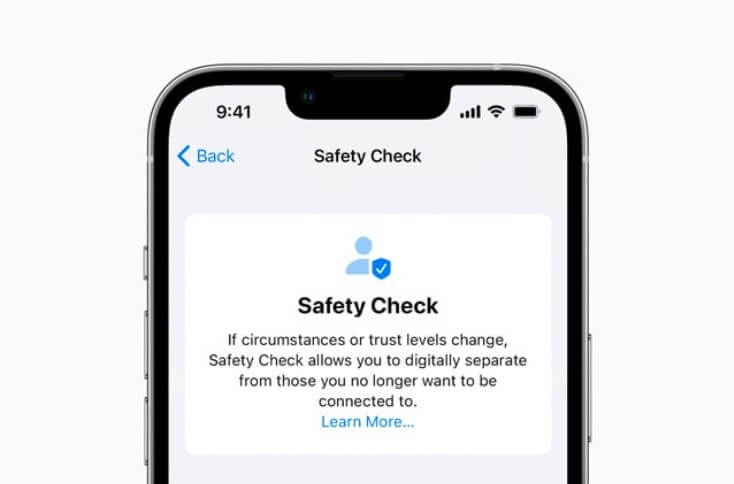
Apple has always taken its users’ privacy and security seriously. With iOS 16, Apple has introduced the Safety Check on iPhones. This feature is a way to help people suffering in abusive relationships.
Apple partnered with several social organizations to create a system for people wanting to come out of an abusive relationship. Since most people use passwords to access their devices and even share passwords with their partners, it is easy to hide away from an abusive partner.
But this can make it harder to escape an abusive relationship. So, the iOS 16 Safety Check feature is a way to support domestic violence victims.
Sounds interesting?
Let’s understand how Safety Check on an iPhone works.
What is the Safety Check on iPhones?
The center of your iPhone’s security is Safety Check. You can run Safety Check on your iPhone regularly to ensure that no unauthorized device or person can ever access your data and activities.
It allows you to check which applications have permission to access your iPhone’s sensors and personal information. It also ensures no useless apps are secretly using these features.
According to Apple, Safety Check is designed for victims of intimate relationships or domestic abuse. The Safety Check feature makes it simple for users to reset all data and location exposure granted to others immediately.
Why Is iOS 16 Safety Check Feature Important?
To begin, Safety Check on iPhones is significant because Apple has always given users the option to share their location with apps and people. In addition, though, Apple has given security like access to the iPhone via Face ID and passcodes.
Safety Check, however, makes it easier for people at risk of domestic abuse to adjust quickly or entirely revoke these permissions from a single location, rather than having to hunt down the various settings scattered throughout the iPhone.
Safety Check functions in two ways:
- Emergency Reset
- Manage Sharing & Access
We’ll go over these iOS 16 Safety Check features in depth below.
How to Use Safety Check on Your iPhone? (Emergency Reset)
Let’s first talk about the Emergency Reset. Emergency Reset is essentially a kill switch that stops sharing any access you may have granted to apps and people all at once.
It is intended to be used when you urgently need to stop sharing data with anyone. For example, your location includes any apps that might track your whereabouts.
Here’s how you can use this feature:
Step 1. Go to Settings > Privacy and Security > Safety Check on your iPhone.
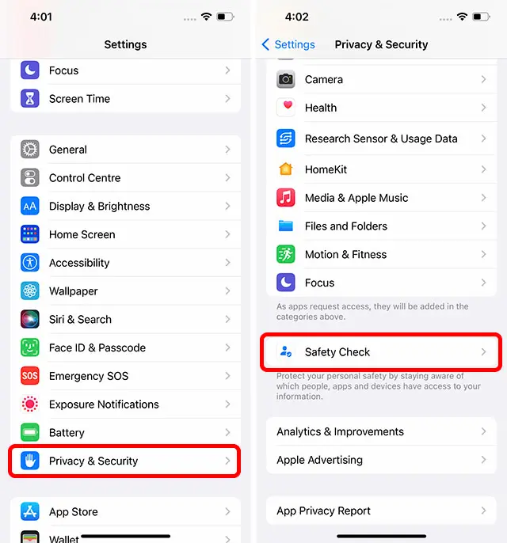
Step 2. Tap on the Emergency Reset button. You will be first asked to identify yourself with a Passcode or Face ID. After that, tap on the Start Emergency Reset button.
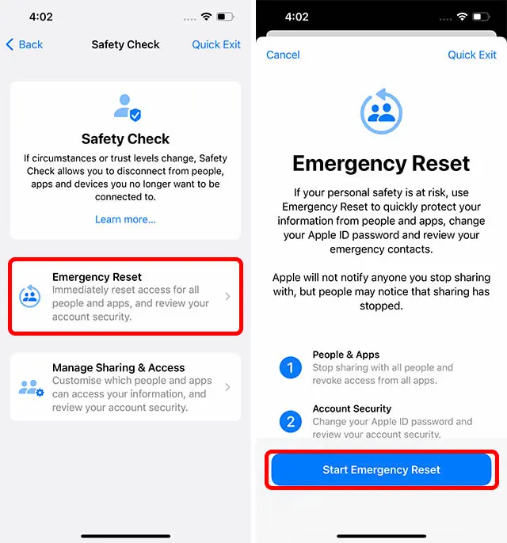
Step 3. This step ensures your iPhone no longer shares information with anyone or any app like location data, photo libraries, etc. To do this, tap on ‘Reset People & Apps.’ Tap on ‘Reset’ to confirm.
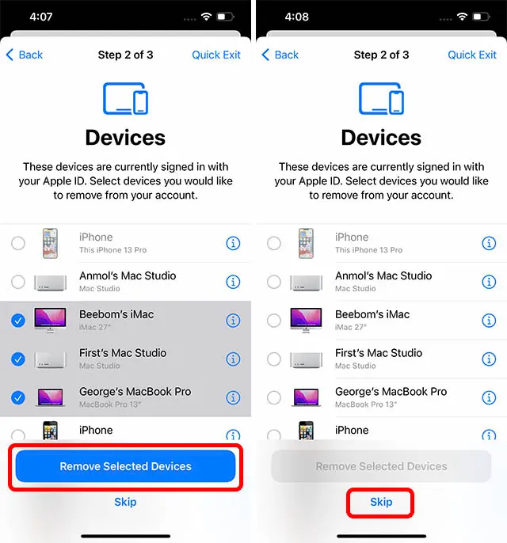
Step 4. After that, Safety Check will ensure that only your devices are linked to your Apple ID. Next, select any devices you want to sign out of and remove your Apple ID remotely. After you’ve chosen the devices, click ‘Remove Selected Devices.’ If there are no such devices, press the ‘Skip’ button.
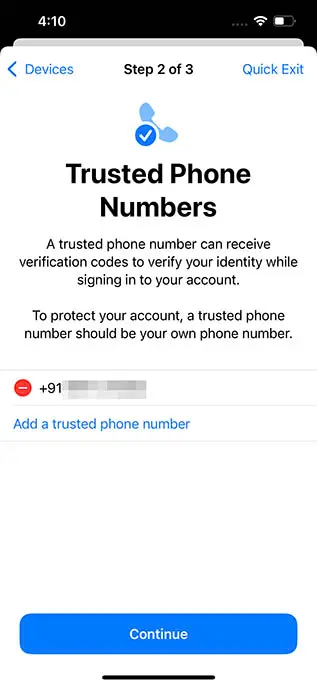
Step 5. Next, add (or remove) trusted phone numbers from your account. These are your phone numbers. If there are more phone numbers in this list, remove them before clicking ‘Continue.’
Step 6. If you share your Apple ID password with an abusive person, it’s critical to ensure they can’t access your Apple account.
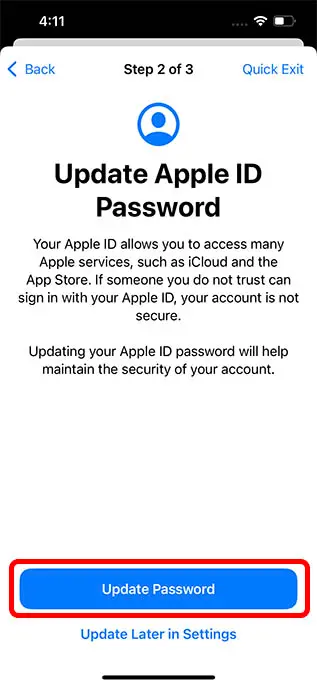
If necessary, Safety Check will allow you to reset your Apple ID password during this step. You can use the ‘Update Password’ button to change your password or the ‘Update Later in Settings’ option to keep the same password.
Step 7. Make a list of your emergency contacts, such as your family members or friends. These contacts will be notified if you ever need to use your iPhone’s Emergency SOS feature. You can add touches here before clicking ‘Continue.’
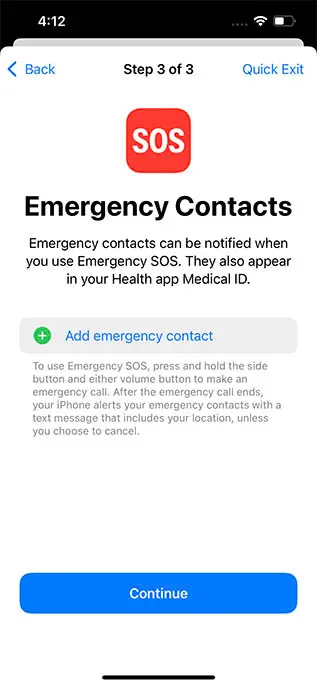
Once you’ve completed these steps, the iOS 16 Safety Check feature will recommend additional actions you can take to improve your safety and peace of mind. Once you’ve completed this list, tap ‘Done.’
How to Use Safety Check on Your iPhone? (Manage Sharing & Access)
You can remove permissions and sharing settings for specific people by selecting the second option, ‘Manage Sharing & Access.’ Here’s how to make use of this feature:
Step 1. Navigate to Settings > Privacy and Security > Safety Check.
Step 2. Tap on ‘Manage Sharing & Access’ and click on Continue.
Step 3. You can see who you’ve shared information with and what information you’re sharing here. From there, you can remove people with whom you no longer want to share information, such as your location, iPhone access, etc.
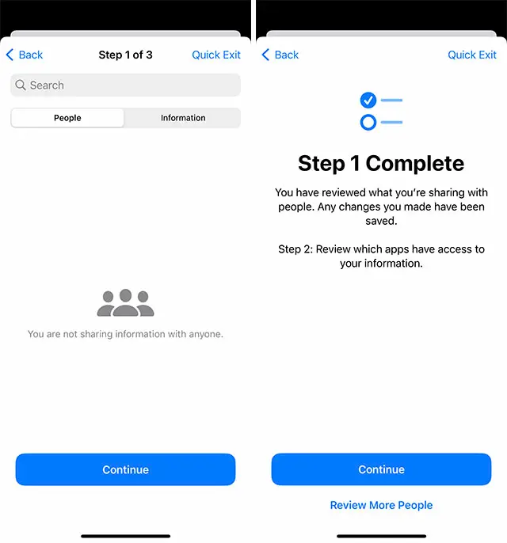
Step 4. You can decide on apps that can access your data in the following step. Next, you can uninstall any apps that you did not install yourself or that you no longer want to use. When finished, press the ‘Continue’ button.

Step 5. Finally, a list of devices you have logged using your Apple ID. If you notice any unidentified devices, remove them. You can also remove devices belonging to the abuser so they no longer have access to your iPhone information. If there are no devices attached, select ‘Skip.’
Step 6. You can now define your trusted contacts. In addition, delete those contacts you no longer trust and add new ones if necessary. When finished, tap ‘Continue.’
Step 7. Your iPhone will then ask you to update your Apple ID password. In case your abusive partner has written down or saved your password. You can easily change your password, so no one else has access to your Apple ID.
Step 8. You can add emergency contacts here before clicking ‘Continue.
Step 9. Finally, to ensure the security of your data, you will be prompted to change your device passcode. You can change your passcode or skip it.
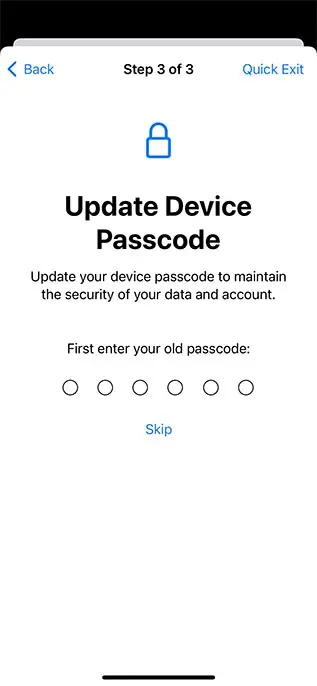
Once you’ve completed these steps, Safety Check on your iPhone will recommend additional actions you can take to improve your safety. Once you’ve completed this list, tap ‘Done.’
Is It Safe to Use Safety Check on an iPhone?
To protect its users’ safety and privacy, Apple will not notify anyone if you stop sharing information, account access, location data, etc. This is done to ensure that victims (or those at risk) of domestic abuse can safely prevent perpetrators from accessing their devices and information without fear of them being notified of the change.
So, that’s pretty much how you use Safety Check on your iPhone. Unfortunately, it is a new feature so we can’t stay much.
But overall, this is an excellent initiative by Apple to secure their users. It is a great social movement to protect people suffering from domestic violence and abusive relationships.
So, if you are also a domestic violence victim, you should try this iOS 16 feature to escape your toxic relationship. That’s it for now! Keep on following for more iOS updates.
Popular Post
Recent Post
How to Troubleshoot Xbox Game Bar Windows 10: 8 Solutions
Learn how to troubleshoot and fix issues with the Xbox Game Bar not working on Windows 10. This comprehensive guide provides 8 proven solutions to resolve common problems.
How To Record A Game Clip On Your PC With Game Bar Site
Learn how to easily record smooth, high-quality game clips on Windows 11 using the built-in Xbox Game Bar. This comprehensive guide covers enabling, and recording Game Bar on PC.
Top 10 Bass Booster & Equalizer for Android in 2024
Overview If you want to enjoy high-fidelity music play with bass booster and music equalizer, then you should try best Android equalizer & bass booster apps. While a lot of these apps are available online, here we have tested and reviewed 5 best apps you should use. It will help you improve music, audio, and […]
10 Best Video Player for Windows 11/10/8/7 (Free & Paid) in 2024
The advanced video players for Windows are designed to support high quality videos while option to stream content on various sites. These powerful tools support most file formats with support to audio and video files. In this article, we have tested & reviewed some of the best videos player for Windows. 10 Best Videos Player […]
11 Best Call Recording Apps for Android in 2024
Whether you want to record an important business meeting or interview call, you can easily do that using a call recording app. Android users have multiple great options too. Due to Android’s better connectivity with third-party resources, it is easy to record and manage call recordings on an Android device. However it is always good […]
10 Best iPhone and iPad Cleaner Apps of 2024
Agree or not, our iPhones and iPads have seamlessly integrated into our lives as essential companions, safeguarding our precious memories, sensitive information, and crucial apps. However, with constant use, these devices can accumulate a substantial amount of clutter, leading to sluggish performance, dwindling storage space, and frustration. Fortunately, the app ecosystem has responded with a […]
10 Free Best Barcode Scanner for Android in 2024
In our digital world, scanning barcodes and QR codes has become second nature. Whether you’re tracking packages, accessing information, or making payments, these little codes have made our lives incredibly convenient. But with so many barcode scanner apps out there for Android, choosing the right one can be overwhelming. That’s where this guide comes in! […]
11 Best Duplicate Contacts Remover Apps for iPhone in 2024
Your search for the best duplicate contacts remover apps for iPhone ends here. Let’s review some advanced free and premium apps you should try in 2024.
How To Unsubscribe From Emails On Gmail In Bulk – Mass Unsubscribe Gmail
Need to clean up your cluttered Gmail inbox? This guide covers how to mass unsubscribe from emails in Gmail using simple built-in tools. Learn the best practices today!
7 Best Free Methods to Recover Data in Windows
Lost your data on Windows PC? Here are the 5 best methods to recover your data on a Windows Computer.
