How to Turn on Screen Time on Mac

Last updated on August 14th, 2023 at 12:12 pm
When your child spends a lot of time on your Mac and says most of the time he spent was on homework, would you certainly believe that he is telling the truth and not lying? Are you concerned about how he spends his time on the Mac machine?
Well, you should be concerned as you never know when kids are navigated to objectionable or dangerous websites.
We need to restrict our kids to be exposed to unknown or unwanted vulnerable Apps and content. For that, we may take the help of a Parental Control App or we may also take advantage of Mac’s Screen Time feature. Now if you are wondering how to turn ON screen time on Mac and how to keep a tap on the same, we have got it sorted for you in this article.
Let’s discuss how to turn ON Mac screen time and keep our kids secured using this Mac’s built-in parental control App.
What is Mac’s Screen Time?
Screen Time is a tool that was launched with the iPhone and iPad in the year 2018 designed to record the amount of time you spend on various apps, social networking sites, and games. If you are spending too much time on your iPhone and iPad, with iOS 12, you can set screen time limits for yourself or your child and develop some healthy device habits.
Screen Time is loaded with blocking features to limit usage. There are other parental controls available which are capable of placing limits on communication, mostly from specific contacts. Let’s understand how to turn on Mac Screen Time.
How to turn ON Mac Screen Time?
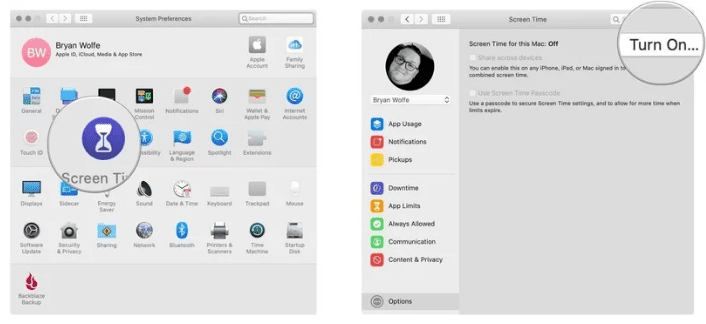
Step 1. Go to system preferences in MacOS Catalina.
Step 2. Click on Screen Time in System Preferences.
Step 3. Select the Options button at the bottom left.
Step 4. Click the Turn On button at the top right.
How to turn OFF Screen Time on MacOS?
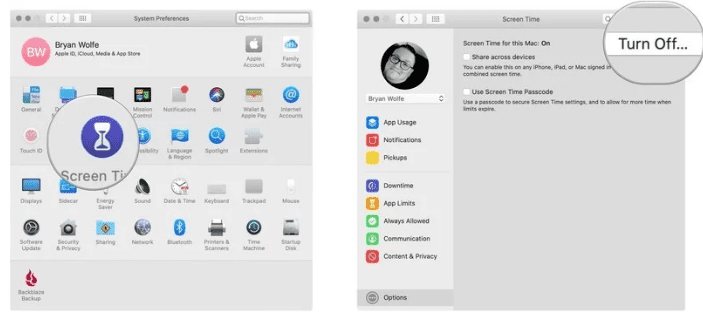
Step 1. Go to system preferences in MacOS Catalina.
Step 2. Click on Screen Time in System Preferences.
Step 3. Select the Options button at the bottom left.
Step 4. Click the Turn OFF button at the top right.
How to Access The Parental Controls Log?
Now once you have captured the Screen Time, We are sure you would wish to know how your kids spent their time on the device. Now it’s time to figure out for what we did this entire exercise for.
Here are the steps to access the Parental Controls log, work on your child’s computer:
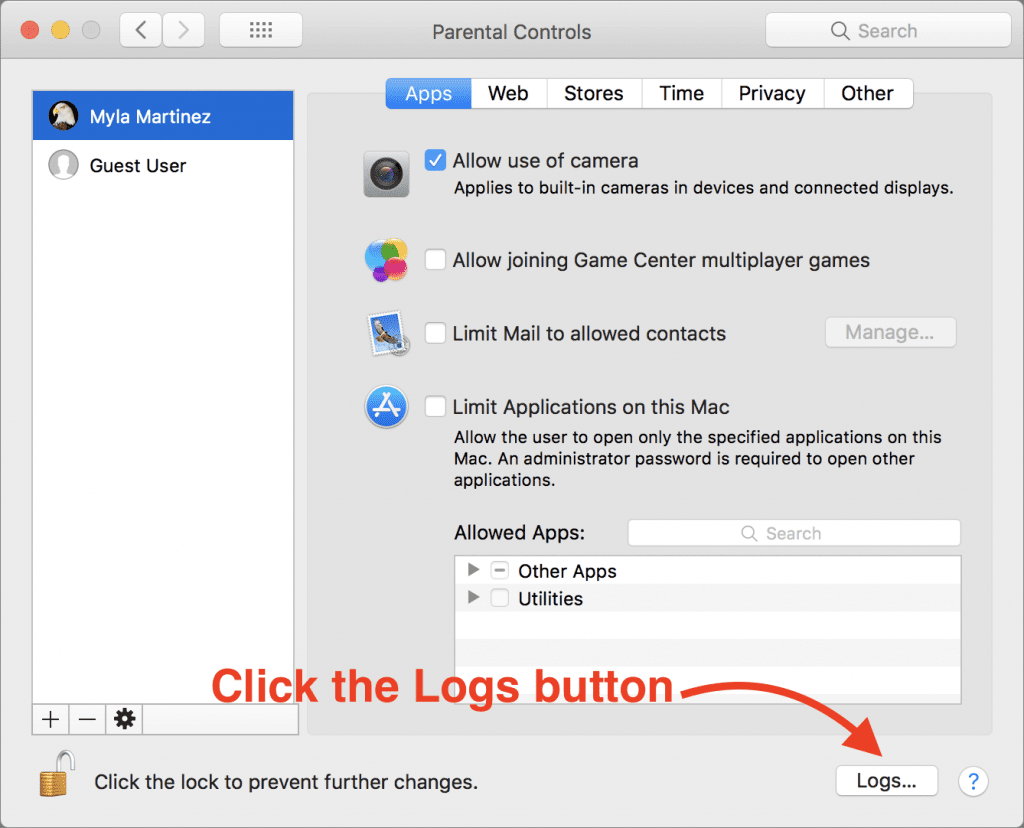
Step 1. Open System Preferences and go to Parental Controls.
Step 2. Click the lock icon at the lower left of the pane, and sign in with your administrator password.
Step 3. From the list at the left, select your child’s account.
Step 4. At the lower right of the pane, click the Logs button.
Add a password to Screen Time on MacOS
When you turn ON Mac Screen Time, there are possibilities that your kid can turn it OFF. You get an option to set a password in Screen Time feature on Mac. This will ensure that your settings on the machine is secured and also use the password to extend the time for users when necessary.
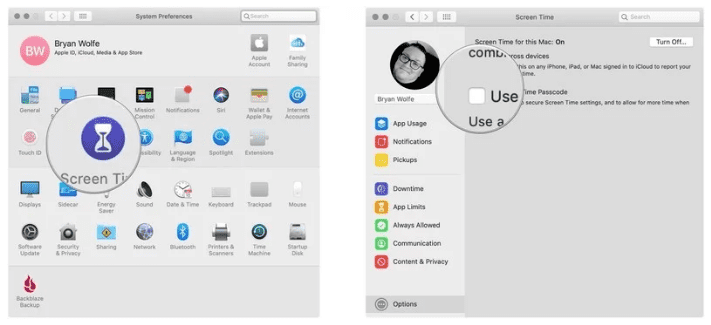
Step 1. Open Screen Time in System Preferences.
Step 2. Select the Options button at the bottom left corner.
Step 3. Check the ‘Use Screen Time Password’ box.
Schedule Downtime using Screen Time for MacOS
Another important feature of Mac Parental Control is that you can schedule downtime on Mac Screen Time. During Downtime, only apps you choose to allow will work and you can make phone calls when applicable. To set up a Downtime schedule, you may follow these steps:
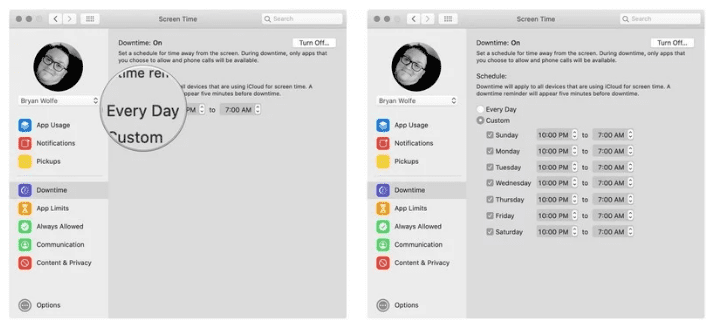
Step 1. Go to Screen Time in System Preferences.
Step 2. Click on ‘Downtime’ on the left-hand side panel.
Step 3. Click on the ‘Turn On’ button to activate Downtime.
Step 4. Configure Downtime settings using the radio buttons by selecting ‘Every Day’ or ‘Custom’ depending on your preferences.
Configure Screen Time to Limit Social Media Use on iPhone or iPad
As we have set Mac Screen Time for Mac computer, we can also set preferences using Screen Time to Limit Social Media Use on iPhone or iPad. This parental Control feature is useful for parents who leave their kids with smartphones to keep them engaged or make use of smartphones.
Step 1. Open ‘Settings’ on your iPhone or iPad and go to ‘Screen Time’.
Step 2. Tap on ‘App Limits’ and configure ‘Add Limit’ under the App Limits section.
Step 3. Look for and tap on ‘Social Networking’ and tap on ‘Add’.
Step 4. Scroll the slider to select the time limit you wish to enforce on all ‘Social Networking’ apps, then tap on ‘Back’ or exit out of ‘Settings’ when finished.
Summing Up
So next time whenever you handover any device to your kid, you know how to turn on Mac Screen Time and ensure that it is turned ON and your kid’s activities are getting captured. So make use of these parental control Apps and if this article helped you or you know someone who can be benefited with these steps, do like and share the article.
If you have any other issues related to Screen Time, do share the same in the comment section and we will revert with an appropriate solution to it.
Author Bio:
Dinesh Lakhwani 

Dinesh Lakhwani, the entrepreneurial brain behind “TechCommuters,” achieved big things in the tech world. He started the company to make smart and user-friendly tech solutions. Thanks to his sharp thinking, focus on quality and the motto of never giving up, TechCommuters became a top player in the industry. His commitment to excellence has propelled the company to a leading position in the industry.
Popular Post


Recent Post

10 Best File Size Reducer Software in 2024
Digitization is one of the key driving factors for the success of modern businesses. However, it does have its limitations like storage and sharing. One of the main issues that global users are facing while managing online or digital data is the large file sizes. The effective management of size and storage by a leading file […]

How to Clone Windows 11 to SSD/HDD/USB Drive
Cloning or saving Windows 11 to an external device can be helpful. It helps users from being stuck in odd situations when there are some errors in the system and no backup. It can be done manually or using a dedicated software tool like the EaseUS Todo Backup tool. The free trial of this tool […]

How to Fix Windows 11 Search Bar Not Working?
The search bar on Windows 11 is one of the widely used features on any system. However, this utility is in-built disabled on Windows 11 system. Hence, users upgrading from Windows 10 to Windows 11 face the issue of using the search bar. Therefore, there is an immediate need for quick but effective solutions to […]

How to Fix Widgets not Working on Windows 11 (8 Solutions)
Windows 11 has brought many new and graphic-intense features for Microsoft users. Widgets is one of the best and most talked about Windows 11 features for both good and bad purposes. Windows 11 Widgets are extremely useful to access different information like weather, sports, photos, and news. In fact, Windows 11 has divided the Widgets […]

Gmail Not Syncing With Outlook (How To Fix)
When your company can utilize Microsoft products such as Outlook but also choose to use Gmail, there is no better option than to sync both. Are you facing difficulties in conducting Gmail and Outlook synchronization? Or, do you face the “Outlook 365 not syncing with Gmail” issue? You may experience difficulties synchronizing some or all […]

10 Best Wi-Fi Analyzer Apps for Mac
Comparison table of top five Wi-Fi analyzer apps for Mac Sr. No. Name of product Compatibility Pricing 1 Wi-Fi Scanner MacOS 10.7 and later 19.99USD 2 KisMac MacOS 10.6 and later Free 3 Mac Wireless Diagnostics Tool MacOS 10.14 and later Free 4 Wi-Fi Explorer Pro 3 MacOS 10.13 and later 19.99USD 5 Homedale MacOS […]

How to Remove Watermark from Photo
A watermark is a symbol or signature that is imprinted on an image. These are often translucent and do not hinder the viewers from enjoying the photo. Watermarking photographs can help safeguard the owner’s copyright by preventing others from using the image without consent. If you are looking for the appropriate approach for how to […]

10 Best Free VR Games 2024 for Windows 10/11
Comparison Table of Top 5 VR Games Product Operating System Ratings (Oculus Store) Free Trial/ version Customer Support Minecraft VR Windows 10 3.3 stars out of 5. Yes/ 16 4,849 reviews Big Screen Windows 8/8.1 or Windows 10 4 stars out of 5 Yes/ 0.900.12.8f95ef-beta-arch5-beta 2,374 reviews PokerStars VR Windows 7/8/ 10, Windows vista 3.4 […]

REASONS TO CHOOSE AZURE IN 2024
Throughout the digital transformation, businesses have been encompassing the most revolutionary paces. Every sector and industry has tapped into the power of cloud and remote storage options for their business resources. In other words, businesses have chosen centralized and more holistic business solutions that cover up their entire data resources no matter the number of […]

10 Best Document Scanning Software
Eliminating the paperwork is a crucial part of the digitization process for any business. Hence, many businesses plan to seek the help of document scanning software in converting the papers into electronic copies. It becomes much easy to manage the electronic forms and files compared to the pile of papers that require sufficient space and […]

