How to Trim Videos in Windows 10?

Last updated on March 27th, 2024 at 4:33 pm
Timing is everything while editing a video clip or movie. Once you trim unwanted parts from the video and put them in the right sequence, you can easily gag out the desired emotions from your viewers.
Adjusting timing in a video is referred to as trimming. Now, if you are wondering that video trimming is a difficult job, you are wrong. There’s nothing easier than trimming a video in Windows 10.
On Windows 10, you can use the default Photos app along with various other third-party video editing tools to get perfectly edited videos. Today, we will talk all about how to trim videos in Windows 10 in a breeze. Brace up, and let’s trim videos in Windows 10.
How to Trim a Video in Window 10 Using Photos App
Whether you wish to crop off unwanted footage or adjust the timing of your video, Windows 10 Photos app is the best solution for you. It is the default Windows 10 video editor with powerful features to trim videos. You can seamlessly trim a video in Windows 10 using the Photos app as:
- Launch the video clip that you want to trim.
- By default, the video will play in Windows 10 Photos app if you haven’t changed default settings.
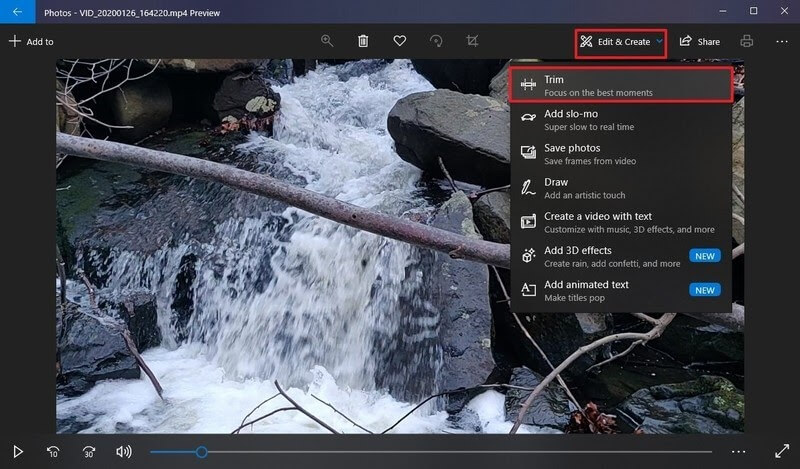
- On the Photos window, click on the Edit & Create button located in the top-right corner and click on the Trim option.
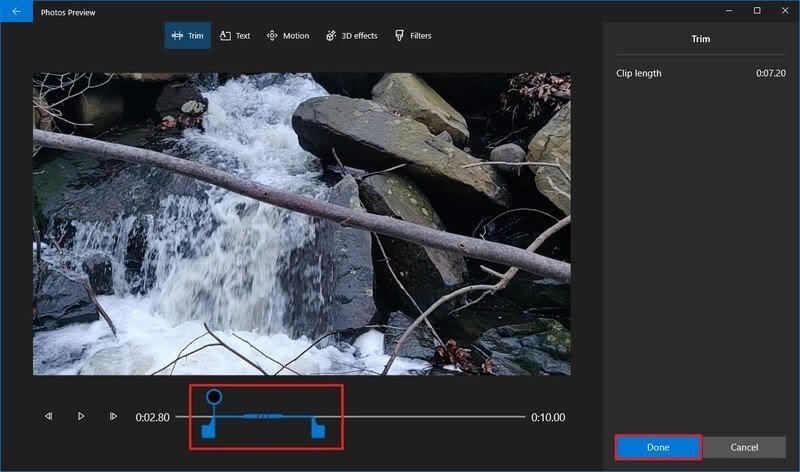
- Now, you have to use white pins — start and end pins to trim the video on Windows 10. When you drag the Start pin to the right, you are trimming away parts to its left. Similarly, you can drag the End pin to cut out undesirable parts toward the video’s end.
- You can use the Blue pin to scrub the footage to trim the right parts.
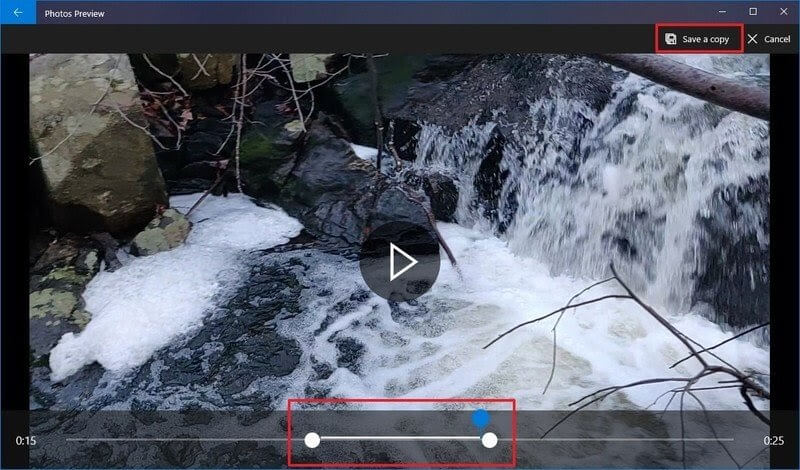
- Once you are satisfied with your trimming, click on the Save a copy button, and the Photos app will save your trimmed video in a new file. Good thing, editing won’t delete the original video from your computer, so you can anytime re-edit it.
How to Trim Multiple Parts of a Video in Windows 10 Using Photos
If you want to trim multiple parts of a video in Windows 10, the Photos app will also allow it. To trim multiple parts of a video clip, you have to follow these steps:
- Launch the Photos app.
- From the top-right corner, click the Select button.
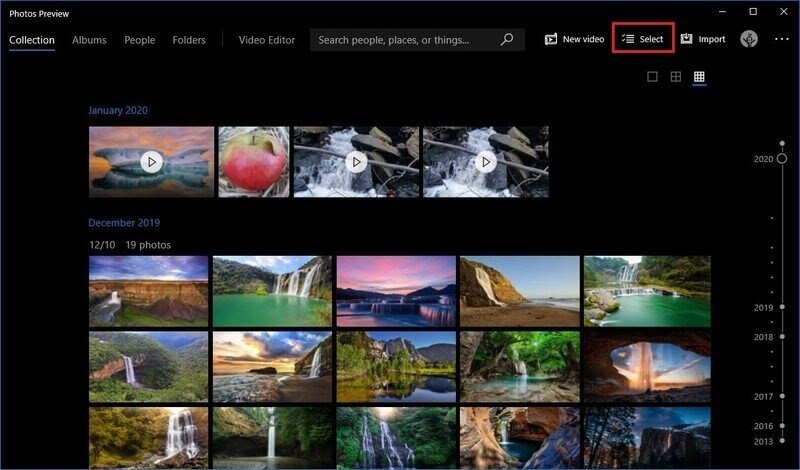
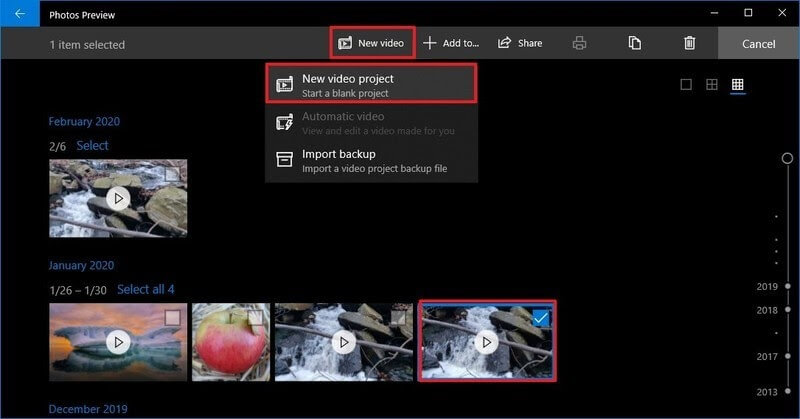
- Check the video that you want to trim and click on the New Video button.
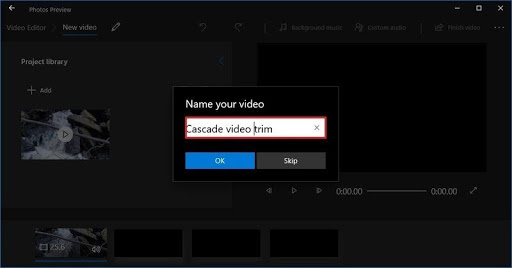
- Select the New Video Project option and give your project a name.
- Click on the OK button.
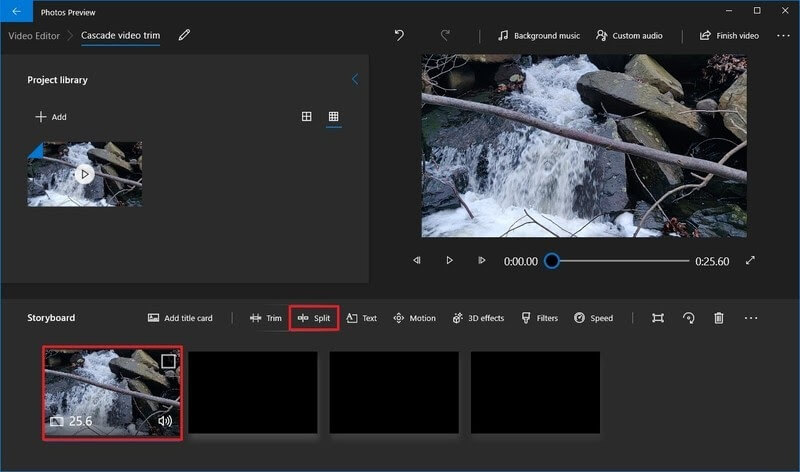
- Select the video clip from the Storyboard and click on the Split button from the toolbar.
- Choose the section that includes the first part of the video that you want to trim.
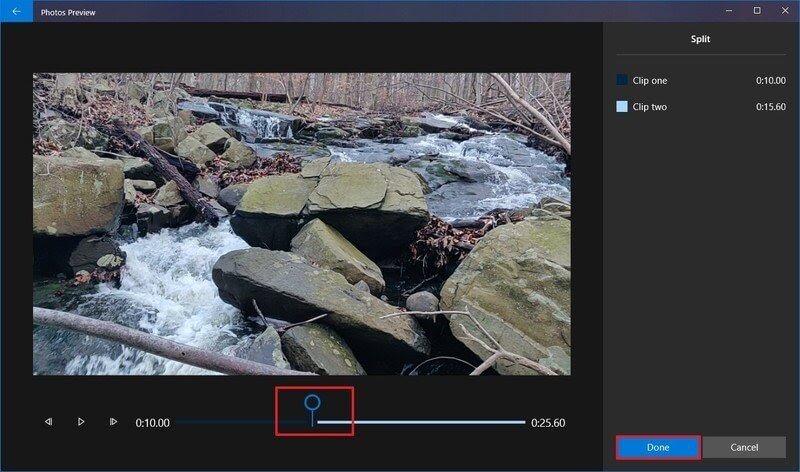
- Click on the Done option.
- Next, select the remaining part of the video and again click on the Split button.
- Now, you have to select the second part of the video that you want to trim and click on the Done button.
- Keep on repeating the steps until you trim all the unwanted parts from the video.
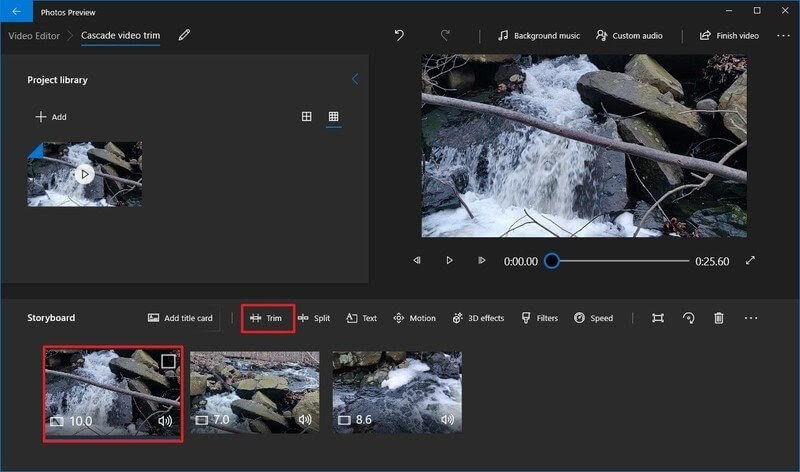
- Once you are done trimming, select the first split clip from the Storyboard.
- Click on the Trim button from the toolbar.
- Using the Blue pin, scrub the section of the video to trim. Only move the pins inwards as outwards movement can modify the previous split settings of the video.
- Repeat the steps to trim all the remaining clips.
- You can use the Play button to preview your trimming work.
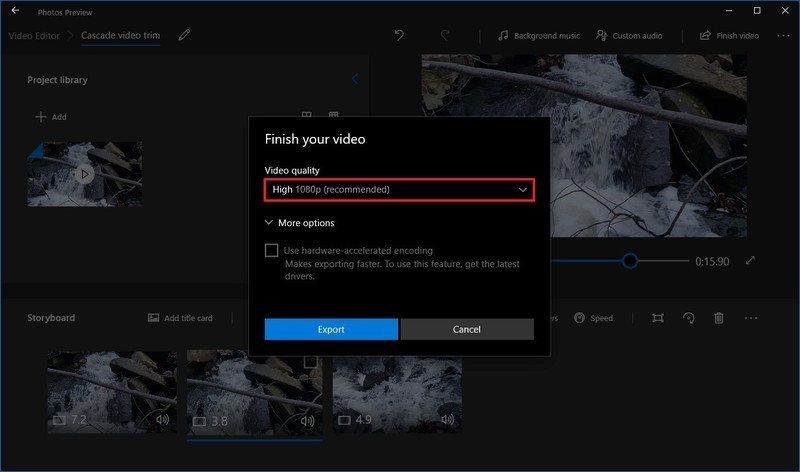
- Once you are satisfied with the video, click on the Finish video button from the top-right corner.
- To check video quality, use the Video quality option from the drop-down menu and fix it to High 1080p (recommended).
- Check the Use hardware-accelerated encoding option under the Move Options section.
- Finally, click on the Export button and select the destination folder and export your trimmed video clip there. And, you can anytime access the video from the Photos app by your given project name.
How to Trim a Video in Windows 10 Using Third-party Tools
If you don’t want to trim a video in Windows 10 using the Photos app, you can download any third-party video editor. Go to Microsoft App Store, and there you will find a plethora of amazing video trimming tools. You can download any tool as per your requirements and start trimming your masterpiece.
Every tool has different steps and features to trim videos in Windows 10. So, you have to explore that out before trimming your videos. Since Adobe has a large legacy of photo and video editing tools, we will give a small demo on how to trim a video in Windows 10 using Adobe Premiere Pro.
- Launch the Premiere Pro on your computer.
- Click on the New Project in the Start screen. You can also select File > New > Project from the main menu.
- Give a name to your project, click Browse to select the save destination, and click on the OK.
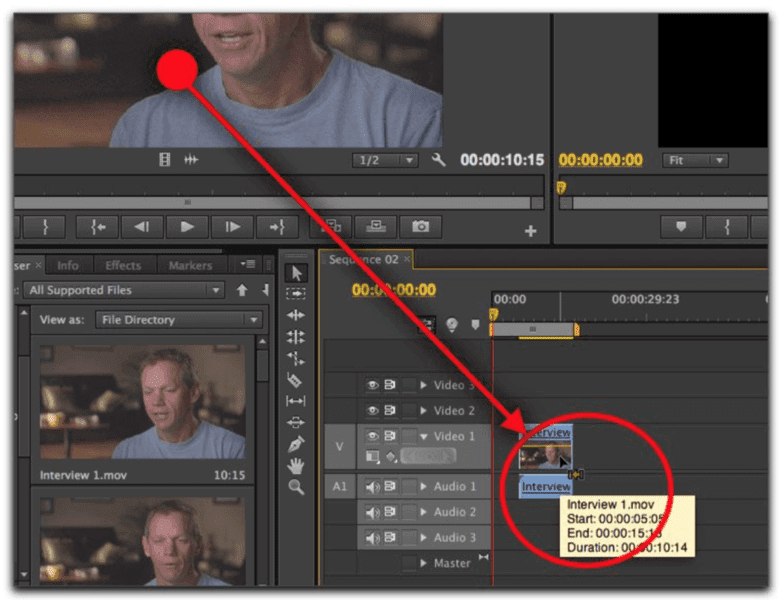
- Now, add your video clip to the project. To do so, go to Select File > Import from Media Browser or drag and drop files from the Media Browser to the Project panel.
- You have two options to trim a video clip — Ripple edit and Rolling edit. Ripple edit lets you shorten the whole video. When you want to shorten a clip while extending the next one, you should use the Rolling edit option.
- Interestingly, Premiere Pro allows you to lock tracks you don’t want to change, so you won’t cut the best part of your video.
If Adobe Premiere Pro isn’t something you want, you can also get other editing tools for Windows 10 like VSDC, Avidemux, Bandicut, and more.
Parting Thoughts
After reading different ways to trim videos in Windows 10, you must have gotten a fair idea about how to trim videos in Windows 10. Also, you have realized how easy and simple it is to trim videos without any technical jargon.
Whether you want to edit your homemade videos or professional clips for your clients, you can easily do it in Windows 10. So, pick your preferred way to trim videos in Windows 10 and get started.
And, don’t forget to follow the TC for more interesting guides and hacks.
Author Bio:
Dinesh Lakhwani 

Dinesh Lakhwani, the entrepreneurial brain behind “TechCommuters,” achieved big things in the tech world. He started the company to make smart and user-friendly tech solutions. Thanks to his sharp thinking, focus on quality and the motto of never giving up, TechCommuters became a top player in the industry. His commitment to excellence has propelled the company to a leading position in the industry.
Popular Post


Recent Post

Importance of the Best Mirrorless Camera for Travelling
It can be difficult to find the best mirrorless camera for under 1000 dollars. This blog post discusses some of the best models on the market and provides a link to Amazon where you can purchase them. We are going to give you a couple of the best mirrorless cameras that are under 1000. We […]

How to Reset Network Settings on a Mac
Macs are usually always trustworthy, although you may experience issues attaching to the web or experiencing poor surfing speeds at times. The web may be operating well on your additional devices, which might be frustrating. That’s not always clear what’s causing an issue, or whether one exists at all. When you discover yourself in a […]

How to Create a Timeline in Google Slides
Timelines are an excellent method for displaying sequential listings of activities from start to end. It is a visual display of information that includes lists, charts, or visuals. A timeline is written down and organized in the same chronological sequence. A timeline is a smart method to condense information and better explain your brand using […]

How to Undo and Redo on a Mac
Almost every Mac software includes the option to implement an “Undo,” that would be, to overturn the previous action. Similarly, practically every single Mac software offers the capability to “Redo,” that would be, to completely upend the most recently undone operation. The Mac shortcut keys for doing Undo as well as Redo have always been […]

How to Increase Internet Speed on Windows 10
Internet connectivity is a mandated requirement for many routine works on Windows 10 systems. Whether it is some official work or personal work, having a smooth internet connection is important for both. However, internet connectivity is not so smooth for all Windows 10 users. This is due to multiple reasons like geographical issues, increased traffic, […]
How to upgrade to Windows 11 for free
Windows 11 offers the ultimate experience to the users and comes with multiple features. Hence, all devices require an updated version of Windows for seamless operations. Many times a user has to go to purchase the costly Windows 11. Due to the cost constraints, it is not feasible for all Windows users to purchase the […]

11 Best File Encryption Software for 2024
The finest encryption software enables keeping your files private and safe for security considerations, as well as protecting them against intrusion. When it relates to securing your data and documents, encryption software seems to have become increasingly vital. Hacking attempts and privacy breaches have made it simpler for total strangers to access the most private […]

How to record screen on Windows 10/11
Have you often pondered how to display your desktop on whether you’re a Windows 11,10 user or recently updated towards the beta windows version 11? It is a question that almost all of us have asked. Using a display capturing app is the most straightforward approach to record a screen. And TweakShot is one of […]

How to recover permanently deleted files in Windows 11?
Windows 11 is the leading operating system that is used on multiple systems globally. Many times users have the issue of recovering the permanently deleted files in Windows 11. There can be multiple reasons that may lead to the permanent deletion of files on this operating system. The good news is that technology helps the […]

How to Burn DVD on a Mac
Are you looking for a way to save movies on DVD, Blu-ray discs and share them with loved ones? You are at the right place; we will share steps to burn DVDs on Mac. Need of Burning Movies to DVD In pursuit of moving users to iCloud, Apple, for some years now, has been moving […]

