How to Remove Bloatware from Windows 10 Easily
Is your brand new laptop bloated with unwanted programs? Unfortunately, then, you are not the only one who is struggling with bloatware. That’s because Microsoft is no longer stronger on bloatware. However, the good thing is that you can remove bloatware in Windows 10 easily.
Today, a new Microsoft device is swamped with a series of unnecessary partnership applications that you might never use. The features like suggestions appearing on your Start Menu or programs running in the background all are bloatware that captures a huge space on your hard drive and slows down your system.
Luckily, there are many ways to debloat Windows 10 gadgets. And in this post, you will get to know all those easy tricks to remove bloatware from your system.
4 Ways to Remove Bloatware in Windows 10
Compared to previous Windows versions, Windows 10 is partnered with more sponsored programs that can increase bloatware in your laptop. On the top, bloatware doesn’t appear in the System > Apps & Features list. Therefore, it is essential for you to know how to debloat Windows 10 quickly, such as—
1. Remove Ads and Suggestions
Do you want to remove certain brand’s ads or Start Menu suggestions? Then, you can have an option to block suggestions from Windows 10. To do so, go to the Start button, enter “suggestion,” and choose the “Show suggestions occasionally in Start” tab.
One more thing you can do is clean your Start Menu toolbar. Simply right-click on the program that you no longer need, and then click “Unpin from Start.” This will put a great relief on your system’s bloatware.
Also, if you are using an annoying Windows 8 tile Start Menu, immediately until it and easily locate the bloated applications.
2. Uninstall Bloated Applications
You can also use the simple uninstall approach to remove bloatware in your Windows 10. To uninstall bloated applications, you can follow these steps—
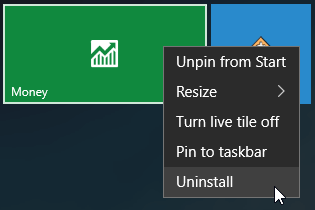
- Click on the Windows icon from the bottom-left corner.
- Next, navigate for the program that you want to remove and right-click on it.
- Finally, click on the Uninstall button and confirm it.
You can repeat the process until you remove all the unwanted bloated applications.
3. Use PowerShell
Here is the automatic method to debloat your Windows 10—PowerShell. Windows PowerShell is a user interface developed by Microsoft to automate tasks and configure management. There you have two options to remove bloatware using PowerShell, including—
Remove-AppxPackage
In this method, you can debloat your computer without removing applications from your system. Instead, you will simply hide the applications, and it won’t disturb you reappearing in Windows reinstalls.
Before you start PowerShell, make sure that no other programs are running on your computer. Now, follow these steps—
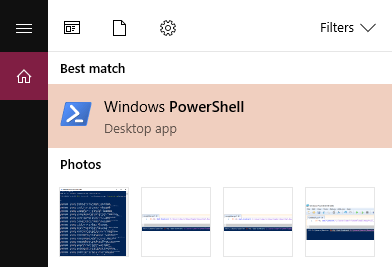
- Enter PowerShell in the search box located at the lower-left corner of the screen.
- Then, click on the “Run as Administrator” option.
- Click on “Yes” to confirm the process.
- Use the below-listed command with the application that you want to hide.
Get-AppxPackage *appName* | Remove-AppxPackage
- Just simply replace the ‘appName’ with the application you want to uninstall and then press Enter.
- Repeat the process until you uninstalled all the applications, such as—
Calculator
Get-AppxPackage *windowscalculator* | Remove-AppxPackage
Alarms & Clocks
Get-AppxPackage *windowsalarms* | Remove-AppxPackage
Camera
Get-AppxPackage *windowscamera* | Remove-AppxPackage
Get Office
Get-AppxPackage *officehub* | Remove-AppxPackage
Groove Music
Get-AppxPackage *zunemusic* | Remove-AppxPackage
Voice Recorder
Get-AppxPackage *soundrecorder* | Remove-AppxPackage
Weather
Get-AppxPackage *bingweather* | Remove-AppxPackage
Use DISM
The second way to completely destroy bloatware with PowerShell is using the DISM command. DISM stands for Deployment Imaging Service and Management. You can implement this command as follows—
- Put PowerShell in the search box located at the lower-left corner.
- Click on the “Run as Administrator” button.
- Press “Yes” to confirm the process.
- You can view the entire bloatware list using this command—
DISM /Online /Get-ProvisionedAppxPackages | select-string Packagename
- Navigate for the program that you want to delete from the system.
- Copy the Packagename for the app and the following command—
DISM /Online /Remove-ProvisionedAppxPackage /PackageName:PACKAGENAME
- Replace the Packagename word with the application name that you wanted to delete based on the earlier generated list. For example—
DISM /Online /Remove-ProvisionedAppxPackage /PackageName:Microsoft.Xbox.TCUI_1.24.10001.0_neutral_~_8wekyb3d8bbwe
- Keep on repeating the process until you have fully removed all bloated applications from your PC.
- Restart your computer to see the effect.
4. Use Third-party Bloatware Apps
If PowerShell is too complicated and traditional uninstallation is too simple for you, in that case, you can use third-party software to remove bloated applications. There are plenty of different bloatware removal apps available in the market, such as NoBloat, FreshStart, Windows 10 Debloater app, and many more.
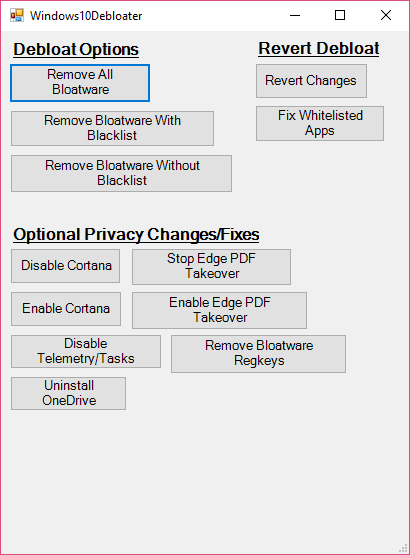
To use different applications, you have to follow the different steps depending upon the app. For example, if you are using the Debloater app to remove bloatware apps, you have to follow these steps—
- Navigate to the Windows 10 Debloater site.
- Click on the Clone or Download button.
- Click on the Zip download and then save the file to your computer.
- Now, click on the “Extract all” button to extract all files from the downloaded zip folder.
- Check the “Show extracted files when complete” box to quickly locate the files.
- Right-click on the Windows10DebloaterGUI and choose “Run with PowerShell.”
- Click open, type Y, and press Enter.
- Windows 10 Debloater will appear on your screen.
- Click on the “Remove All Bloatware” button.
- That’s it will immediately remove all bloated applications from your computer system.
So there you go! You now know how to remove bloatware from your Windows 10 computer on time. Whenever your new PC slows down, don’t forget to run a bloatware cleaning and free up sufficient space on your hard drive.
If you have any more questions, you can share them in the comments. And don’t forget to like and share this post with your friends!
Popular Post
Recent Post
Best Y2mate Alternatives- A Comprehensive List In 2024
Videos are one of the most popular media types among consumers currently, for posting promotional or informative content. This is why YouTube has one of the biggest user-bases currently, and people search for tools to easily download these files. However, YouTube features a strong algorithm and legal guidelines that stop people from downloading or using […]
Availability of ONLYOFFICE Docs v.7.0- Latest Version Comes with More Modifications
ONLYOFFICE delivers the newest Docs v.7.0 with additional features, new upgrades, and a host of revisions for professional collaboration uses. Having a high-quality feature-rich office suite invigorates the productivity rate of companies, professionals, and even homeowners. ONLYOFFICE developers have therefore come up with the latest version of the DOCS online office suite. The version boasts […]
Review: Status Saver For WhatsApp 2024 [Free]
Ever since WhatsApp launched its own Status feature, people are loving it. As we can add interesting images and videos to our WhatsApp Status to show it to others and also watch others’ status. But the problem often faced by the users is that WhatsApp does not have a Status saver option. So what do […]
5 Cybersecurity Tips To Manage Your Remote Personnel Challenges
Did you know that your company’s information can unintentionally be put at risk by you and your employees when working remotely? This could possibly lead to fraud, data breaches, and a plethora of other unwanted consequences. Although remote working offers many benefits, it also comes with some risks. Continue reading if you want to learn […]
What is FileRepMalware & How to Remove It?
For the continued safety of the digital system and files, many people download a third-party antivirus program into their device. These keep the system safe from security issues after an intricate scanning process. Windows devices can install options like Norton, Avast, or AVG for quick and efficient malware/virus detection. In many cases, the tag FileRepMalware […]
SaaS Growth in 2022: Growth, Challenges, and Strategies
Software-as-a-Service (SaaS) is expanding very quickly in the entire IT business. SaaS models are the first preferences of many enterprises because of their flexibility, cost-effectiveness and subscription-based model. In the pandemic, companies required the cloud network; thus, SaaS has only got growth and will be growing. Gartner and BMC have given highly optimized reports, according […]
M1 Pro vs. M1 Max: Which Is The Better Mac Chip
In 2020, Apple’s M1 chip debuted and blew us all away with how much it improved performance and efficiency in the MacBook Air M1, Mac Mini M1, and MacBook Pro M1. Mac users were still on the M1 performance hangover when Apple launched M1 Pro and M1 Max with better performance promise. Both chips are […]
Apple Pay Not Working! Here’s How to Fix It (10 Fixes)
Today, people are more and more relying upon digital payments because they are safe and fast. But sometimes, when you have to make an urgent payment, and your Apple Pay is not working, there is nothing more frustrating than it. Apple Pay might have military-grade level security, but it is still prone to errors. However, […]
How to Fix WiFi Disappeared in Windows 11?
Users have complained that the WiFi symbol has disappeared from their taskbar after upgrading their PC to Windows 11. A network icon is present on the taskbar that displays network access. When your device doesn’t have the essential drivers installed, you will see an absent WiFi icon. Furthermore, if your computer’s WiFi adapter is deactivated […]
How to Fix Windows Update Service Not Running
The majority of Windows upgrades address security concerns. It is the most serious issue, as viruses or hackers might take advantage of them. Other flaws and concerns in Windows 10 can be resolved through updates. They may impact the sustainability of your OS, even if they are not accountable for security breaches. When you check […]


