


A slow computer makes it hard to focus. Programs take too long to open. Free space keeps shrinking until the disk is almost full. This happens to most PC owners at some point. Even new machines can slow down after a while. That is the exact problem cleanup tools are built to solve. They comb […]
How to Install and Use PuTTY for Mac
Introduction:
In the realm of remote server management and secure network communication, PuTTY has earned a reputation as a reliable and versatile tool. Originally designed for Windows, PuTTY has expanded its reach to include other operating systems, including macOS, to cater to the needs of a wider user base. Hence, if you’re a Mac user seeking a seamless remote access solution, you’ve landed in the right place.
This comprehensive guide aims to assist you in installing and effectively utilizing PuTTY for Mac. Whether you’re an experienced system administrator, a networking enthusiast, or someone requiring secure connections to remote servers, this step-by-step tutorial will equip you with the knowledge and tools necessary to make the most of PuTTY’s capabilities on macOS.
What is PuTTY?

PuTTY is an open-source application that utilizes network protocols such as Telnet and rlogin on both Windows and UNIX platforms, complemented by an Xterm terminal emulator. With the support of these protocols, PuTTY facilitates remote sessions on computers over a network. Known for its popularity in text-based communication, PuTTY is particularly renowned for its utility in connecting Microsoft operating system-based computers to Linux servers.
PuTTY is not available as a native application for macOS, but you can install it by using MacPorts. It was initially developed for Windows, and while there are third-party solutions that attempt to bring PuTTY functionality to macOS, they may not provide the exact same experience.
How to Install PuTTY for Mac?
If you’re looking to install PuTTY on macOS, macports.org provides a reliable method to accomplish this task without any hassle. While Homebrew is another option, it doesn’t include the graphical user interface (GUI) component of PuTTY.
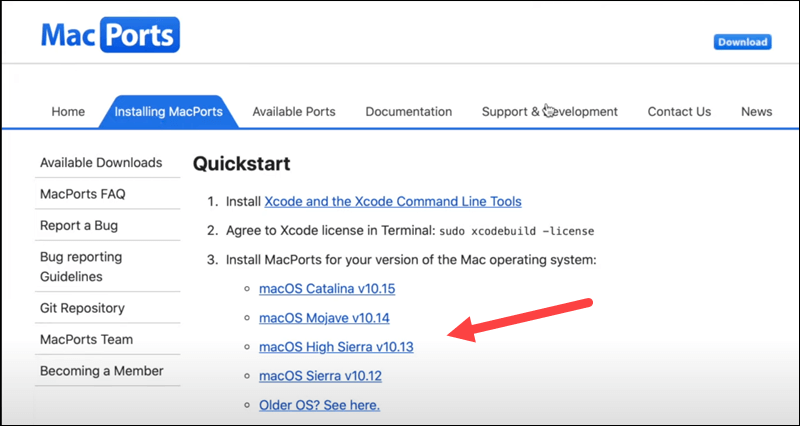
To install PuTTY for Mac using MacPorts, you can follow the steps:
- Open the Terminal application on your Mac. You can find it in the Applications>Utilities folder of your device.
- In the Terminal, enter the following command and press Enter:
sudo port install putty
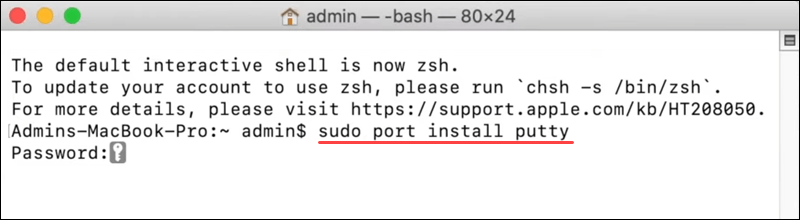
This command will initiate the download and installation process for three programs: putty, puttygen, and puttytel. These will be installed in the /opt/local/bin directory.
- Once the installation is complete, you should be able to run PuTTY from the command line by simply typing:
putty
The /opt/local/bin directory should be in your system’s PATH configuration, allowing you to access PuTTY effortlessly.
- If you prefer a shortcut to access PuTTY more conveniently, you can create a symbolic link or a Mac alias. For instance, to add an icon to your Desktop, enter the following command:
ln -s /opt/local/bin/putty ~/Desktop/PuTTY
This command will create a symbolic link named PuTTY on your Desktop so that you can access it easily without digging deep into folders.
With these steps, you’ll have PuTTY macOS ready to facilitate remote server management and enhance the networking experience on your device.
How To Use PuTTY on macOS?
By now, we believe you have successfully installed PuTTY for Mac. So, here comes the next step. There are two ways to run PuTTY on a Mac. You can either use the shortcut link placed on the Desktop or use the Terminal app to launch PuTTY.
To open PuTTY using the Terminal app, type “PuTTY” and press Enter.
Once the app launches on your device, you will see the following window on the screen:
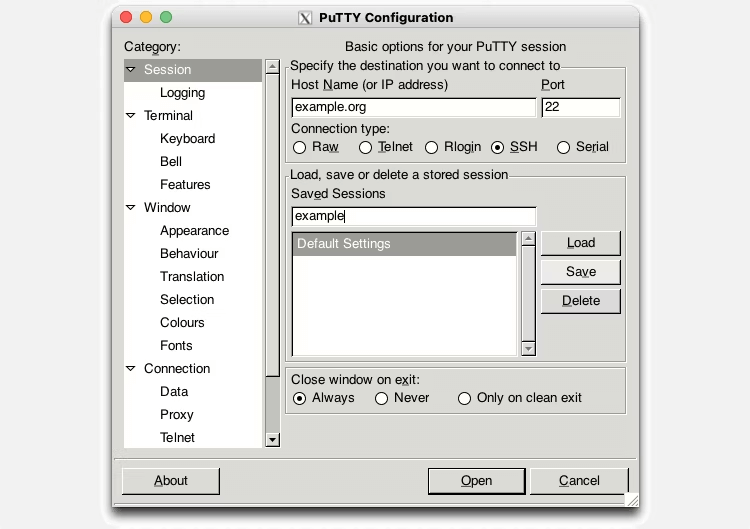
As you can see in the snapshot, PuTTY offers you four different types of connections that you can choose including RAW, Telnet, rlogin, SSH, and Serial. For performing basic operations, you can pick SSH as a default choice.
To get started, enter a hostname or IP address in the textbox. Select a connection type to set up a remote connection. Hit on the “Open” button to connect to the chosen server.
And that’s it! You now have PuTTY for Mac installed on your device. You can use this tool to connect remotely to computers, access different ports, and so on.
Is it Safe to Use PuTTY on Mac?
PuTTY is generally considered safe to use on macOS, as it is a widely used and respected terminal emulator and SSH client. However, make sure to download PuTTY from official and trusted sources, such as the official PuTTY website or reliable package managers like MacPorts. We would recommend you avoid downloading PuTTY from untrusted or third-party websites to minimize the risk of downloading compromised or modified versions.
In addition to this, regularly check for PuTTY updates and install them to benefit from bug fixes and security improvements.
Conclusion
PuTTY is a versatile tool for remote server access and management, and MacPorts makes it available for macOS. You can download and install PuTTY on your Mac in just a few easy steps, then use it to connect to remote servers and run commands easily. Be sure to adhere to security best practices when using PuTTY macOS, such as installing the tool from reputable sources, keeping your system and the program up to date, and using secure connections.
You can increase your productivity and effectiveness as a system administrator, network engineer, or developer by installing PuTTY on your Mac.
Frequently Asked Questions
1. Can I use PuTTY on a Mac?
Yes, you can use PuTTY on a Mac, but it’s not built in like on Windows. You’ll need to download a version made for macOS, such as the one available through Homebrew or third-party apps like PuTTY for Mac. Once installed, it works just like the Windows version for SSH and Telnet connections.
2. Is PuTTY free to use?
PuTTY is completely free and open-source. You don’t need to pay anything to download or use it. It’s trusted by developers and system admins around the world for secure remote access, and it’s regularly updated by the community.
3. What is PuTTY used for?
PuTTY is mainly used to connect to other computers remotely using protocols like SSH and Telnet. This is helpful for managing servers, transferring files, or running commands on a remote machine. It’s a simple but powerful tool for anyone working with networks or web hosting.
Author Bio:
Dinesh Lakhwani 

Dinesh Lakhwani, the entrepreneurial brain behind “TechCommuters,” achieved big things in the tech world. He started the company to make smart and user-friendly tech solutions. Thanks to his sharp thinking, focus on quality and the motto of never giving up, TechCommuters became a top player in the industry. His commitment to excellence has propelled the company to a leading position in the industry.
Popular Post
Recent Post

Fortect Software Review: The Ultimate PC & Mobile Cleaning, Optimization & Security Tool
Slow computers are a common problem for almost every Windows user. Well, yes! Over time, your PC picks up junk files. These files sit quietly in the background. They take up space and slow things down. Programs open slower. Windows takes longer to boot. Even simple tasks like opening a folder can feel sluggish. There […]

CCleaner PC Optimizer Review: A Complete Guide for Windows Users
If your computer has started to feel slow, you are not alone. Most Windows PCs slow down over time. Junk files pile up. The registry gets messy. Too many apps open when you start your PC. All this adds up and makes even a good machine feel tired. This is where a PC cleaner tool […]

Auslogics Duplicate File Finder: Full Review and User Guide
A computer quietly gathers clutter over time. This includes duplicate photos, repeated downloads, and forgotten backups hiding in random folders. This buildup slowly eats away at storage and can make even a fast PC feel sluggish. Manually finding and deleting duplicates is tedious. It means checking every folder, comparing file names, and guessing which copies […]

CCleaner Duplicate File Finder: Key Features, Pricing, Step-by-Step Guide and More
Every computer collects junk over time. Right? Well, yes! Photos often get copied twice. Documents get saved in two folders by mistake. Old downloads pile up and never get deleted. This slowly eats up your storage space, and most people do not even notice until their drive is almost full. That is where a duplicate […]

Duplicate File Finder Pro: A Complete Review, Everything You Should Know
Computers collect thousands of files over time. Well, yes! Many of them end up being duplicates created by backups, downloads, or accidental copies. These extra files take up valuable storage space and make it harder to keep everything organized. Finding and removing them manually can take hours. Right? Duplicate File Finder Pro is a tool […]
Top 3 Duplicate File Finder for Windows 11 & Windows 10
If your PC storage keeps filling up even after you delete big files, duplicate files could be the real reason. Most of us save the same photo twice, download a document more than once, or copy a whole folder by mistake. Over months and years, these duplicate files pile up quietly. You do not even […]

Monitor Screen Calibration Guide: Everything You Should Know
Your monitor shows colors every single day. But are those colors actually correct? Most people never stop to check this. They just use the screen as it comes out of the box. This habit can lead to wrong colors in photos, videos, and work files. Colors may look too warm or too cold without you […]

How To Check Installed RAM and RAM Slots [Complete Guide]
RAM plays an important role in how smoothly a computer runs. Short for Random Access Memory, it stores the data and instructions that Windows and active applications need at any given moment. From opening multiple browser tabs to running games and productivity software, RAM helps keep everything responsive. A system with limited memory may experience […]

What is Microsoft Autopilot Everything You Need To Know
Technology has changed the way companies manage computers. Well, yes! Employees now work from offices, homes, and remote locations. Setting up devices manually for every worker takes time and effort. It can also create mistakes that slow down productivity. This is where Microsoft Autopilot becomes useful. It helps businesses prepare and deploy Windows devices with […]

