How to Compress Files on your Mac
Bulky files are a great hindrance when you have to transfer or move them. Plus, they unnecessarily take up more room on your hard disk and slow down its performance. But you can easily tackle large files by knowing how to compress files on your Mac.
The compressed file bearing .zip extension lets you store a number of files in a file and make them send around quickly. On Mac, compressing or decompressing files is a lot simpler than you are thinking. Thanks to a little hidden app, Archive Utility, you can compress files with a click.
In this article, you will learn how to compress files on Mac using all the possible ways. We will also discuss some additional points that can make handling compressed files a lot easier on Mac.
Things to Consider Before Compressing Files on Mac
Default Mac compression and decompression format is ZIP, which is the most acceptable format on the internet. Mac also supports compressed archive (.cpgz) and regular archive format. So, you should select the compression format considering where you are sending files. For example, use a compressed archive when you are sending files to Unix and Linux OS devices.
The actual amount of file compression depends on its content. Some types of files are more compressible than others. Therefore, don’t get annoyed if your compressed files on Mac aren’t light.
Also, it takes some time to compress files on Mac. Depending upon your Mac’s processor speed and RAM capacity, compression and decompression time vary. File compression time also depends on the size of the files that you are compressing.
How to Compress Files on your Mac
To compress files on your Mac, you can follow different directions, such as:
Compress a File on Mac from Finder
- Launch the Finder and search for the file or folder you want to compress.
- Control-click or right-click on the file to launch the pop-up menu.
- Click on the Compress Filename.
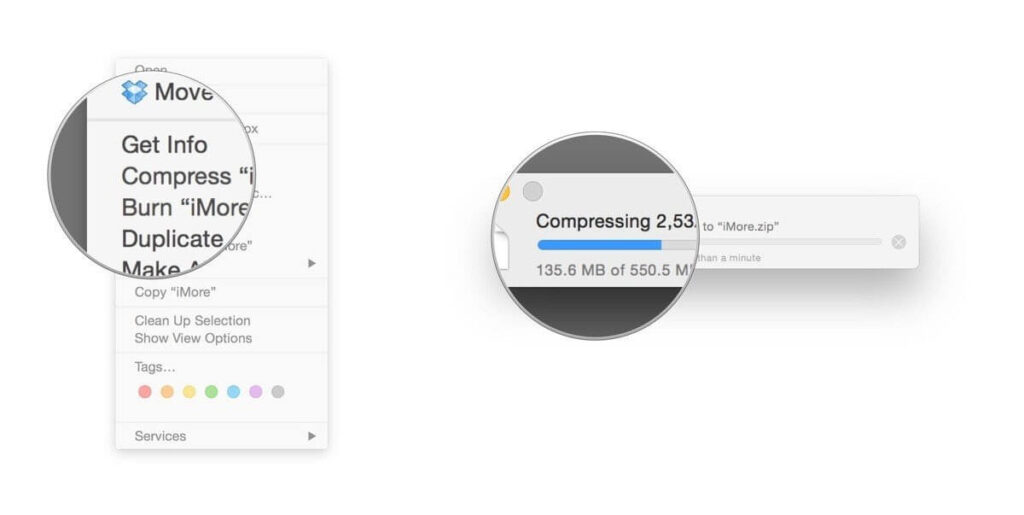
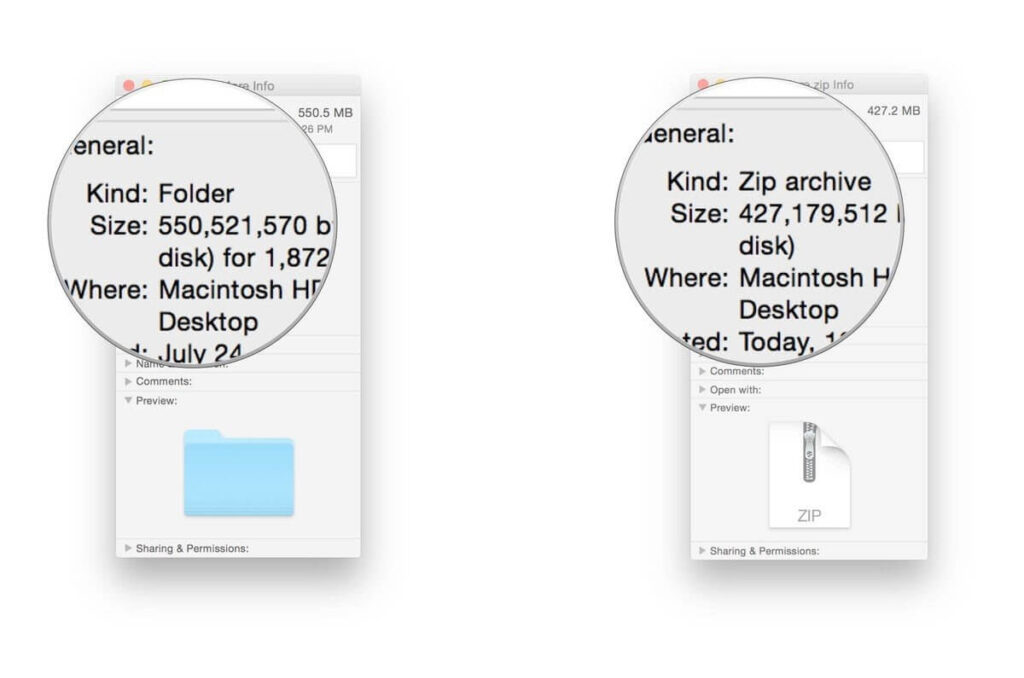
- Mac will start compressing your selected file or folder. Once it’s done, you will find the filename ending with .zip next to the original file.
- Your original file won’t get affected in the process anyway.
Compress Multiple Files on Mac
Mac allows you to compress multiple files to easily move or send them. To compress multiple files on Mac, you have two options:
- Create a new folder using Shift + Cmd + N within Finder or on the desktop.
- Give a name to your new folder.
- Drag and drop all files that you want to compress.
- Hold down the Ctrl key and click the folder; select the Compress option on the menu.
- Once the zipping process is complete, you can delete the new folder that you have just created. Deleting it won’t impact the zipped folder.
Second option to compress multiple files on Mac via launching the Archive Utility app. Using this method, you don’t have to create a new folder to store together all compressed files.
- Go to System > Library > CoreServices > Applications > Archive Utility.
- Here you can select all files and folders that you want to compress, right-click and choose Compress.
Compress Files on your Mac Using Third-party Apps
If you don’t prefer the default Mac compression features, you can always use the third-party compression tools. You can download numerous file compressors like 7-Zip, WinZip, Keka, and many more from your Mac App Store. Based on your requirements, you can use file compressors on Mac.
Things to Do After Compressing Files on your Mac
Once you have compressed files on your Mac, you can send, move, decompress or password protect them. With your compressed files, you can do the following things:
How to send compressed files on Mac
You can simply attach a zipped file or folder to an email and send it. You can also send compressed files via Skype, WhatsApp, or other messaging apps on the Mac.
How to move compressed files on Mac
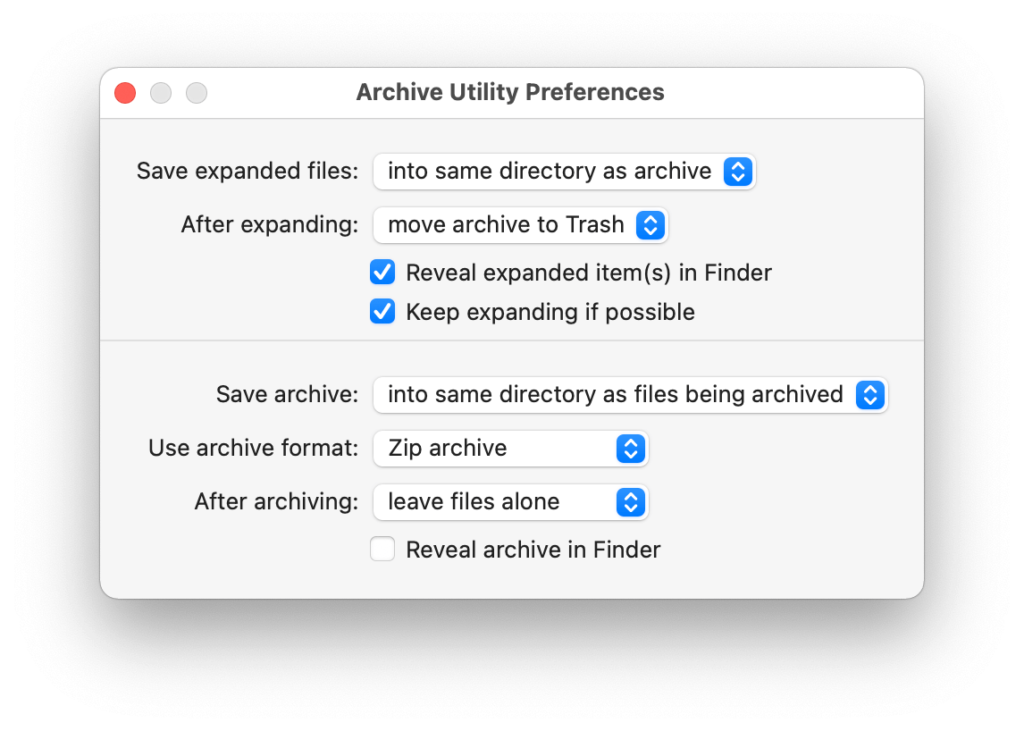
You can change the destination of your compressed by opening the Archive Utility app. Open the app, click on the drop-down menu at the top of the screen and select Preferences. Click on the Save Archive menu and select Into and pick the destination for your zip file.
How to decompress files on Mac
To open compressed files on your Mac, simply double-click on it. However, if you need to decompress an archive that’s not a zip, you can use third-party tools like The Unarchiver.
How to extract safe files from compressed files
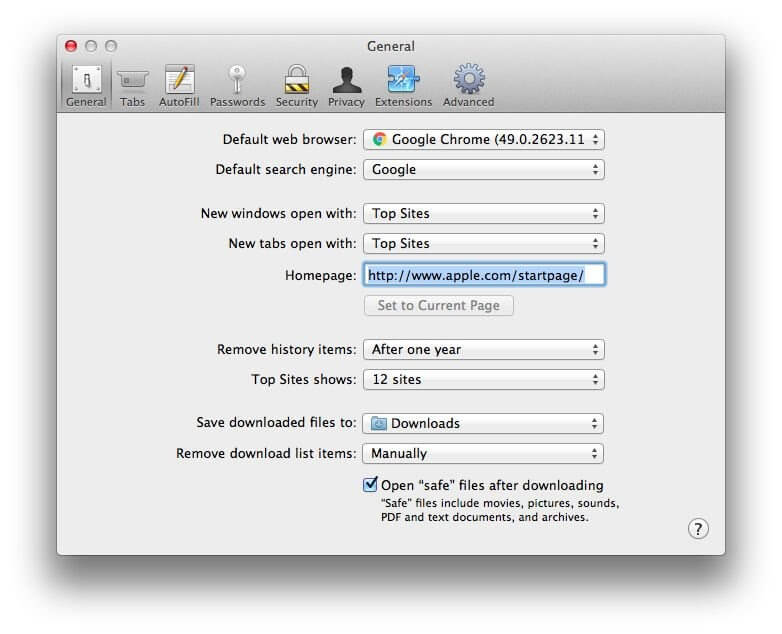
Most web browsers automatically unzip what they consider is safe to download, and Safari is one of them. Go to the Safari drop-down menu, click on Preferences and select the General Tab. Now, tick on the option ‘Open safe files after downloading.’
How to password protection compressed files
It is a bit challenging to password-protect zipped files. But if you are familiar with Terminal commands, it will be a piece of cake for you. Go to Applications > Utilities > Terminal, or you can use Spotlight to search it. Once the Terminal opens, type in the following command (imagine file name is TechCommuters):
cd Desktop
zip -e techcommuters.zip techcommuters.jpg
In the case of folders, you have to use this command:
zip -er techcommuters.zip tech commuters
How to open password-protected compressed files
No need to worry about Terminal to open an encrypted zip file. Just double-click and enter the password, and it will unzip in a regular manner.
Wrapping Thoughts
The process to compress files on Mac is genuinely very easy. Within a few clicks, you can compress or decompress files and folders on your Mac. And you can easily send or move files on the internet. In this post, we have touched on all aspects of compressing files on macOS, but if you have any other better way, do share with us. Meanwhile, keep on following the TC for more informative posts.
Popular Post
Recent Post
Top 5 Borderless Payments Apps In 2024
Discover the leading top borderless payment apps reshaping global transactions in 2024. Explore seamless cross-border transfers and innovative features through these apps.
Movavi Video Splitter Online: A Comprehensive Review
Explore Movavi online Video Splitter for free with our detailed review. Learn how to easily split and customize your videos. Discover its features and usability for all your editing needs.
How to Stop PS5 from Turning on With TV [2024]
The PlayStation 5 (PS5) is a powerful gaming console that offers an immersive gaming experience. However, one common issue that many users face is the console turning on automatically when they turn on their TV. This can be frustrating, especially if you’re not planning to use your PS5 at that moment. Here, we will explore […]
How to Clear the Delivery Optimization Cache in Windows
Delivery Optimization in Windows is a feature that helps users save bandwidth and improve download speeds by downloading updates and apps from other Windows devices on the same network or even from the internet. While this feature is beneficial, it can accumulate a significant amount of cache over time, impacting system performance. Here, we will […]
How to Add Multiple Monitors To Your Windows 10/11 Laptop [2024]
Multitasking and productivity are key factors for many individuals. Adding multiple monitors to your Windows 10 or Windows 11 laptop can greatly enhance your workflow, improving your overall efficiency. If you are wondering how to connect 2 or more monitors to your Windows 10 laptop, you are in the right place. Here, we will discuss different […]
How to Get Help in Windows 11: Complete Guide
Learn the best ways to get help in Windows 11 PC. Using these ways you can find help to solve issues in Windows 11.
How to Check SSD or HDD in Laptop [Windows 11/10]
Solid State Drives (SSD) and Hard Disk Drives (HDD) are the two main hard drive types that rule the laptop storage industry. Although they both store data, they are very different in terms of durability, speed, and performance. Knowing whether the SSD or HDD in your laptop is important since it may help you better […]
How to Stop Your Phone from Turning Off By Itself
Having your phone unexpectedly turned off can be frustrating and inconvenient, especially when it happens frequently. Whether you’re in the middle of an important call, playing a game, or simply browsing the internet, an unexpected shutdown can disrupt your productivity and disrupt your day. Here, we will explore some effective methods to help you if […]
Reboot and Select Proper Boot Device Windows 11: 7 Ways to Fix
Are you facing the “reboot and select proper boot device” on your Windows 11 PC? if yes, then find the best ways to fix this error.
Top 10 LiveLeak Alternatives In 2024
Since LiveLeak’s shutdown, many users have been searching for alternatives to the platform. There are plenty of LiveLeak alternatives in 2024. Therefore, if you are looking for a LiveLeak alternative, you are in the right place. Here, we will discuss some of the best LiveLeak alternatives in 2024. LiveLeak and its Evolution LiveLeak, established in 2006, […]


