How to Compress Files on your Mac

Bulky files are a great hindrance when you have to transfer or move them. Plus, they unnecessarily take up more room on your hard disk and slow down its performance. But you can easily tackle large files by knowing how to compress files on your Mac.
The compressed file bearing .zip extension lets you store a number of files in a file and make them send around quickly. On Mac, compressing or decompressing files is a lot simpler than you are thinking. Thanks to a little hidden app, Archive Utility, you can compress files with a click.
In this article, you will learn how to compress files on Mac using all the possible ways. We will also discuss some additional points that can make handling compressed files a lot easier on Mac.
Things to Consider Before Compressing Files on Mac
Default Mac compression and decompression format is ZIP, which is the most acceptable format on the internet. Mac also supports compressed archive (.cpgz) and regular archive format. So, you should select the compression format considering where you are sending files. For example, use a compressed archive when you are sending files to Unix and Linux OS devices.
The actual amount of file compression depends on its content. Some types of files are more compressible than others. Therefore, don’t get annoyed if your compressed files on Mac aren’t light.
Also, it takes some time to compress files on Mac. Depending upon your Mac’s processor speed and RAM capacity, compression and decompression time vary. File compression time also depends on the size of the files that you are compressing.
How to Compress Files on your Mac
To compress files on your Mac, you can follow different directions, such as:
Compress a File on Mac from Finder
- Launch the Finder and search for the file or folder you want to compress.
- Control-click or right-click on the file to launch the pop-up menu.
- Click on the Compress Filename.
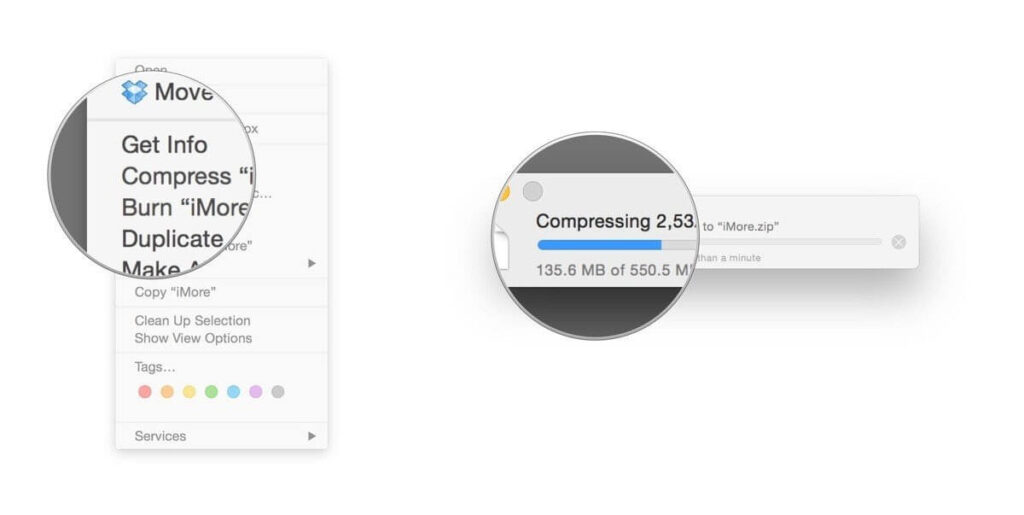
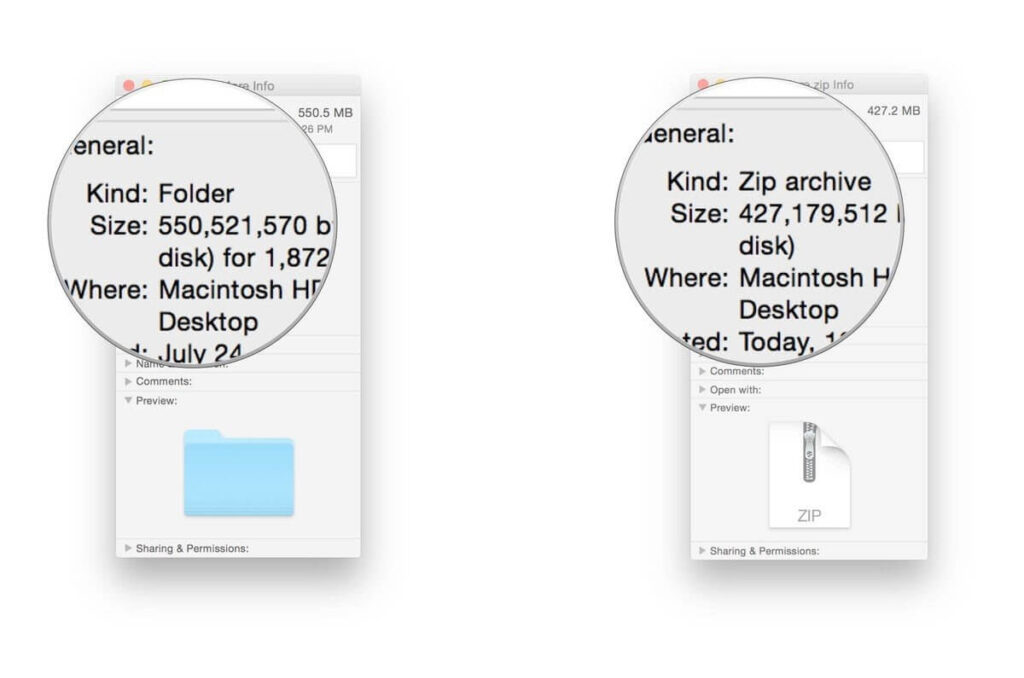
- Mac will start compressing your selected file or folder. Once it’s done, you will find the filename ending with .zip next to the original file.
- Your original file won’t get affected in the process anyway.
Compress Multiple Files on Mac
Mac allows you to compress multiple files to easily move or send them. To compress multiple files on Mac, you have two options:
- Create a new folder using Shift + Cmd + N within Finder or on the desktop.
- Give a name to your new folder.
- Drag and drop all files that you want to compress.
- Hold down the Ctrl key and click the folder; select the Compress option on the menu.
- Once the zipping process is complete, you can delete the new folder that you have just created. Deleting it won’t impact the zipped folder.
Second option to compress multiple files on Mac via launching the Archive Utility app. Using this method, you don’t have to create a new folder to store together all compressed files.
- Go to System > Library > CoreServices > Applications > Archive Utility.
- Here you can select all files and folders that you want to compress, right-click and choose Compress.
Compress Files on your Mac Using Third-party Apps
If you don’t prefer the default Mac compression features, you can always use the third-party compression tools. You can download numerous file compressors like 7-Zip, WinZip, Keka, and many more from your Mac App Store. Based on your requirements, you can use file compressors on Mac.
Things to Do After Compressing Files on your Mac
Once you have compressed files on your Mac, you can send, move, decompress or password protect them. With your compressed files, you can do the following things:
How to send compressed files on Mac
You can simply attach a zipped file or folder to an email and send it. You can also send compressed files via Skype, WhatsApp, or other messaging apps on the Mac.
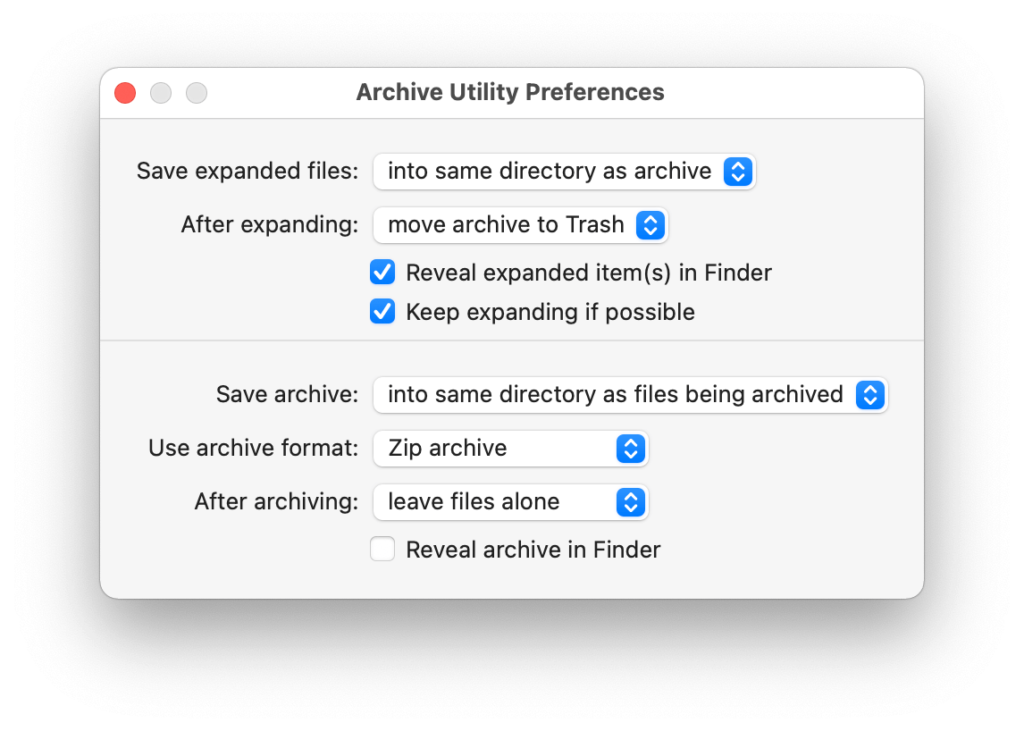
How to move compressed files on Mac
You can change the destination of your compressed by opening the Archive Utility app. Open the app, click on the drop-down menu at the top of the screen and select Preferences. Click on the Save Archive menu and select Into and pick the destination for your zip file.
How to decompress files on Mac
To open compressed files on your Mac, simply double-click on it. However, if you need to decompress an archive that’s not a zip, you can use third-party tools like The Unarchiver.
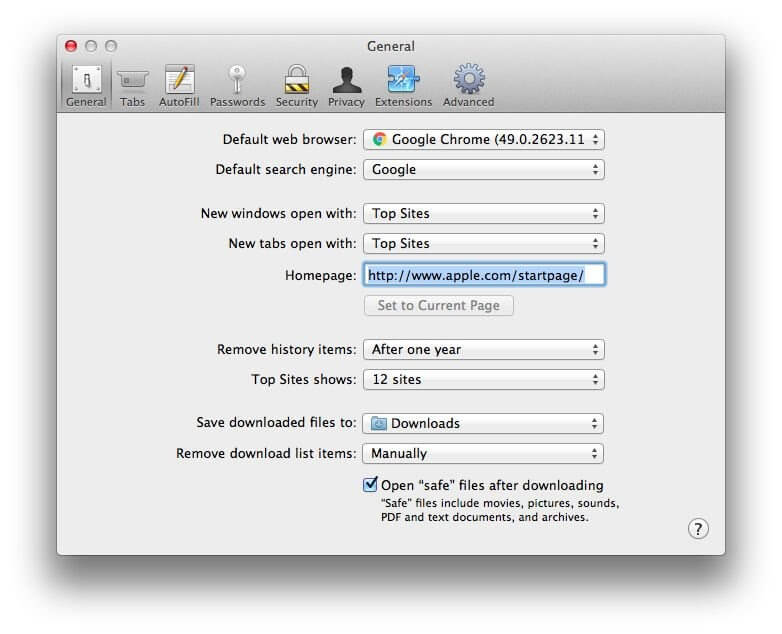
How to extract safe files from compressed files
Most web browsers automatically unzip what they consider is safe to download, and Safari is one of them. Go to the Safari drop-down menu, click on Preferences and select the General Tab. Now, tick on the option ‘Open safe files after downloading.’
How to password protection compressed files
It is a bit challenging to password-protect zipped files. But if you are familiar with Terminal commands, it will be a piece of cake for you. Go to Applications > Utilities > Terminal, or you can use Spotlight to search it. Once the Terminal opens, type in the following command (imagine file name is TechCommuters):
cd Desktop
zip -e techcommuters.zip techcommuters.jpg
In the case of folders, you have to use this command:
zip -er techcommuters.zip tech commuters
How to open password-protected compressed files
No need to worry about Terminal to open an encrypted zip file. Just double-click and enter the password, and it will unzip in a regular manner.
Wrapping Thoughts
The process to compress files on Mac is genuinely very easy. Within a few clicks, you can compress or decompress files and folders on your Mac. And you can easily send or move files on the internet. In this post, we have touched on all aspects of compressing files on macOS, but if you have any other better way, do share with us. Meanwhile, keep on following the TC for more informative posts.
Author Bio:
Dinesh Lakhwani 

Dinesh Lakhwani, the entrepreneurial brain behind “TechCommuters,” achieved big things in the tech world. He started the company to make smart and user-friendly tech solutions. Thanks to his sharp thinking, focus on quality and the motto of never giving up, TechCommuters became a top player in the industry. His commitment to excellence has propelled the company to a leading position in the industry.
Popular Post


Recent Post

How To Check Screen Time On android?
Digital Well-being is an essential health aspect that you need to take care of. It is very important to understand that mobile phones should not be used so much that it becomes a threat to your social life. Additionally, with several applications that are interesting, you could get addicted to using your mobile. However, to […]

What Is Onion over VPN and How Does It Work?
Security and privacy are the two main challenges of any modern digitized system. While data is vulnerable during the transfer from one system to another, unauthorized access compromises the privacy of the crucial information. Hence, the IT world is struggling to develop modern tools and technologies that add an extra layer to the existing security […]

How to Optimize CPU Speed In Windows 10 PC? – 10 Tips
Undoubtedly, Windows 10 is one of the fastest and robust operating systems. But over time, Windows 10 PCs start to slow down due to malware attacks, less disk space, heavy temp files, and so on. There’s nothing to worry about if your Windows 10 PC is also running at a bulk cart speed. You can […]

10 Best Free Drawing Apps for MacOS
A Mac’s HD display with brilliant colors is the ideal partner for every digital designer. In addition, employing the best-in-class art programs on the computer will satisfy your desire to create fantastic art. However, suppose professional drawing programs like Adobe Illustrator and Corel Painter are too expensive for you. In that case, you may need […]

How to find your Windows 11 product key?
Many users know that Windows 11 is a free upgrade to Windows 10 users. However, there is the need for the product key when the activation is lost after switching from Windows 10 to Windows 11. It is easy to find the Windows 11 product key using different methods. There are four different ways to […]

How to Set a Sleep Timer Shutdown in Windows?
At some point in an individual’s work life, we all had to stay up late to complete a project assignment. However, with the exhaustion of working so much, we doze off after some time, leaving our work and computer on. When this occurs, you awaken several hours afterwards to find that the pc has been […]

How to Access Microsoft’s New Emoji in Windows 11
Ever since the public introduction of Windows 11, we’ve seen it gradually mature further towards the operating system that it is presently. Microsoft is working hard to give Windows 11 a next-generation experience, as well as new updates, are being released as a result. So now, emoticons in Windows 11 have been updated. Microsoft later […]

How to Transfer iPhone Photos to Your Mac (8 Easy Solutions)
Have you clicked a stellar image with your iPhone and now want to upload it on your website or edit it? Then, you can easily transfer your iPhone photos to your Mac to edit them with robust MacOS editing tools and further upload them on the web. Transferring photos from iPhone to Mac can save […]

How to Set Up and Use iCloud on Mac
If you haven’t set up iCloud on your Mac yet, do it now. iCloud is a powerful cloud storage service for Apple users that allow people to back up and synchronize email, photos, contacts, and other files across various devices. iCloud service was introduced in 2011, and it supports MacOS 10.7 or higher. As of […]

How to Create a Guest User Account on Mac
Computers are a very personal thing today. They store all your private documents, photos, videos, and other data. Thus, giving your Mac password to someone else is never a good idea. But what if you have to share your Mac with a colleague or friend for some reason? Sharing Mac’s user password can jeopardize your […]

